The Passionate Pursuit of Delight

Category: Food Page 2 of 10

Pasta with Garlic and Olive Oil

Pasta with Garlic and Olive Oil-7

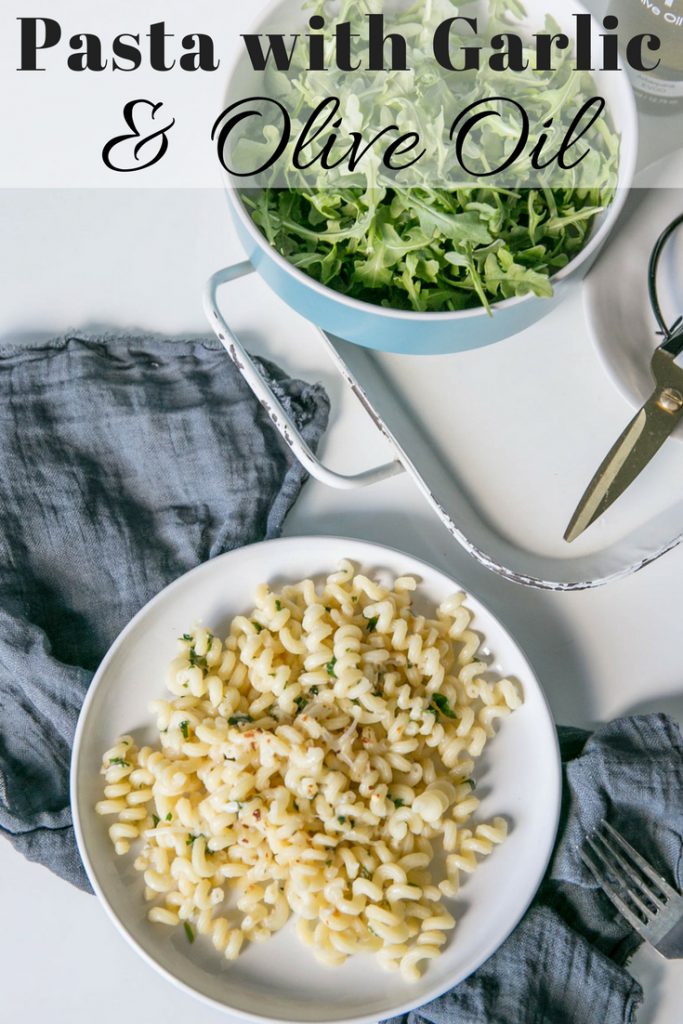
Pasta with garlic and olive oil is the easiest weeknight dinner. Ever. Even stopping for take-out is a bigger hassle than making this bowl of pasta. Plus, it’s cheaper and made with ingredients that are actually food. All that aside, I recently realized something shocking. Despite being raised Italian and having a deep love of pasta, I have never posted a pasta recipe here at Hello Fun Seekers! How is that even possible? I rectify that oversight today.

I also have to say that I have never bought into the low-carb phenomena. My great-grandmother lived until she was 96 and my grandmother will be 100 later this year. Believe me, those ladies had pasta as a staple in their diets. So, eat your cauliflower crusts if you want but I will be over here enjoying a delicious bowl of pasta.

Pasta with Garlic and Olive Oil-5

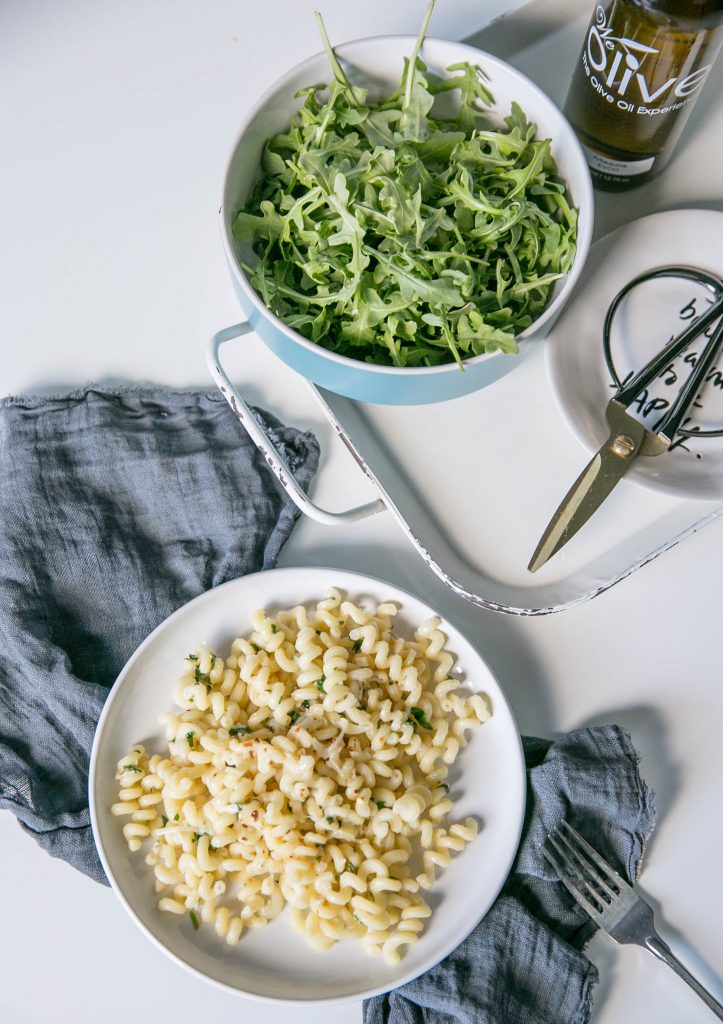
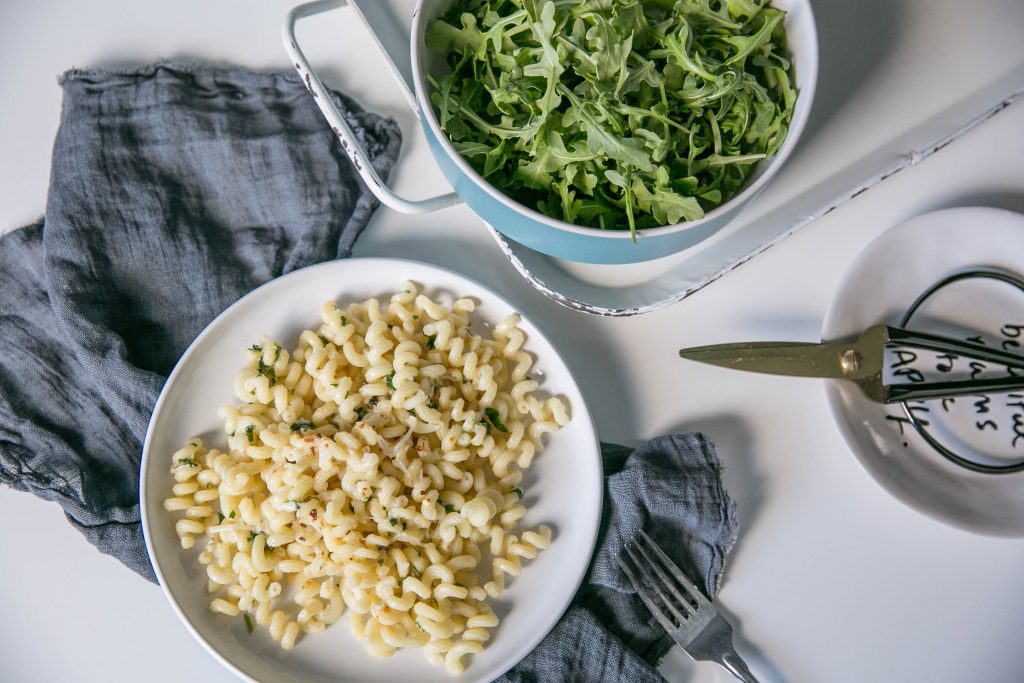
Fusilli is one of my favorite pasta shapes. The curlicues aren’t just pretty to look at but they create numerous nooks and crannies for the sauce to adhere to as well. Properly cooking the pasta is crucial. You will often here people talk about cooking it al dente, ‘to the tooth’, meaning that it still has some texture. There is nothing worse than overcooked mushy pasta.

In order to avoid overcooking the pasta, I typically finish cooking my pasta in the sauce which serves an important purpose. To accomplish this, I boil the pasta for a minute or two less than what the package instructions recommend. Finishing the pasta in the sauce allows the pasta to soak up the sauce and infuse the pasta with all that flavor.

The order of operations for this dish is to start your pasta cooking and then start the sauce. Speaking of the sauce, this pasta is for garlic-lovers only and although it is quick to make it does require your careful attention for a few minutes. Garlic burns easily and can scorch quickly so have all your ingredients prepped when you start cooking.

Pasta with Garlic and Olive Oil-3

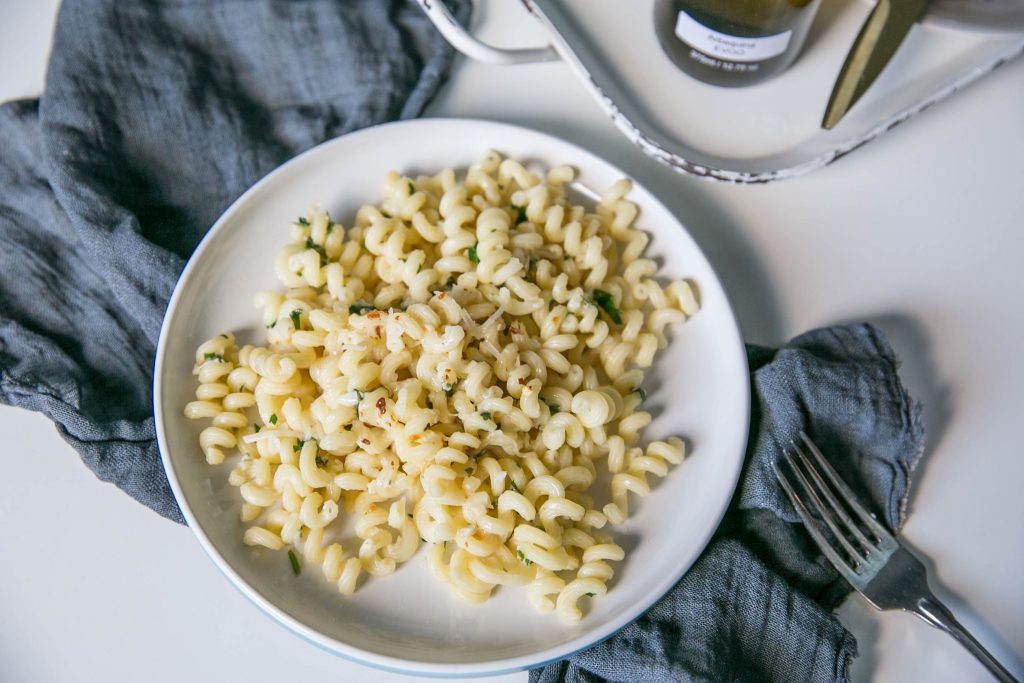
The simplicity of the ingredients and the balance of flavors are what make this pasta special. The olive oil is luxurious, the crushed red pepper provides a spicy kick, the squeeze of lemon juice brightens up the sauce, and finally, the Italian parsley adds a touch of freshness.

I hope you will try this classic pasta and let me know what you think.

How to Make Pasta with Garlic and Olive Oil

Pasta with Garlic and Olive Oil

Shakshuka

Shakshuka-4

Shakshuka has an unusual name that may not roll off the tongue easily at first but believe me once you make this you will be shakshuka-ing all the time. Shakshuka is a dish that is popular in North Africa and the Middle East. Basically, the dish consists of eggs poached in tomatoes, onions, red peppers, and various spices.

Shakshuka is incredibly versatile and can be served for dinner or brunch. Most of the ingredients are pantry staples and from start to finish you can make this meal in just over 30 minutes. Plus, when you are done your kitchen will smell like heaven. I kid you not.

Shakshuka-25

One unusual element of this dish is using a large can of whole, peeled tomatoes. I like to pour the whole can into a large bowl and crush the tomatoes by hand before adding them to the skillet.  This process adds not only the terrific flavor from the whole tomatoes but provides the sauce a beautiful rustic texture.

But, be warned, wear an apron or clothes that you don’t care about because it is a messy process. If you hate messes you could also use a pastry blender to break up the tomatoes. But, why not bring out your inner Lucille Ball and smash those babies up like an Italian grandma? Check out this video. This woman gets me.

Having bread to soak up the sauce is crucial. My preference is a nice crusty loaf or fresh warmed pitas. A crisp green salad would round out the meal perfectly.

Last year, a few Hello Fun Seekers readers and I all made shakshuka simultaneously and live-tweeted our progress on Twitter. It was really fun! Would you all be interested in doing something like that from time to time? Let me know in the comments below if you think that sounds like fun.

How to Make Shakshuka

Shakshuka

Parmesan Garlic Clams

Parmesean Garlic Clams overhead shot

I used to feel intimidated by the thought of cooking clams. How do I store them once I get home? What do I need to do to prep them for cooking? It all seemed somewhat overwhelming. But, you know what they say, you should do one thing every day that scares you. I am so glad that one day I decided to face my fear and figure out how to cook clams. Boy, am I glad that I did because these Parmesan Garlic Clams are now part of my repertoire.

Besides fresh clams, the key to this type of preparation is having a flavorful broth to cook the clams in. In order to make Parmesan Garlic Clams, you will use butter, white wine, and broth as the base and shallot and garlic for flavor. A pinch of crushed red pepper flakes add a spicy note. But, a crucial part of this dish is having a crusty baguette available to soak up that delicious broth.

Parmesean Garlic Clams-18

The most important part of the process is getting clams that fresh and have been properly handled. I only buy fresh clams from my fish market or local grocery store whose fish department has a reputation for selling high-quality, fresh fish.

Clams should smell like the ocean and their shells should be closed. Tap any partially opened shells about the counter and if they don’t close then discard them. You want the clams to remain alive prior to cooking them so leave them exposed to the air so that they don’t smother. I usually place the bag in a bowl of ice with the top of the bag left open in the fridge.

Digging for Clams

About an hour or two before you plan to cook the clams remove them from the fridge and give each clam shell a scrub with a kitchen brush. Then, gently place the clams in a large bowl full of water. Let the clams soak in the water for about an hour. They will dispel any sand or grit that is in their shells. Gritty clams are the worst so be sure to do this step. You can read this informative article from Bon Appetit about clams if you want to learn more.

I love to serve Parmesan Garlic Clams with a salad, a crisp white wine, and crusty loaf bread.

Parmesean Garlic Clams-33

How to Make Parmesan Garlic Clams

Other seafood recipes that you may want to check out:

Parmesan Garlic Clams pin


Colcannon

Colcannon-6

St. Patrick’s Day is just over a week away and what better way to celebrate with a traditional Irish dish. Colcannon is mashed potatoes with cabbage or kale. As with many traditional dishes, every family has its own way in which they make it their own. But, the basics include creamy mashed potatoes with softened greens, and scallions or chives. I added garlic to this Colcannon recipe because it is delicious and while I am half Irish, I am also half Italian.

The first consideration is which type of potatoes to use. Colcannon is traditionally made with russet potatoes but I have made it with Yukon gold potatoes too and love the way it turns out. For the greens, you can use cabbage, kale, or Swiss chard. The cabbage maintains more crunch which is a nice contrast to the mashed potatoes. Kale and Swiss chard with soften more but they do share a more vibrant green color which is pretty. My recommendation is to use whichever green you prefer.

Colcannon-4

A few more words about greens. Do you grow your own greens? They are so easy to grow! Now is the time to start planting seeds. I grow greens in raised beds, window boxes, and various sized pots. Some of my favorite greens to grow are arugula (sometimes called rocket), mesclun mix, kale, and Swiss chard.

I adore Baker Creek Heirloom Seeds and pleasure read the catalog all winter long. Visit their website for inspiration. Seriously, can we talk about the gorgeously colored stems on this Swiss chard? In the garden, greens keep on giving all until the summer heat makes them bolt. The good news is that you can replant again in the fall.

Colcannon-1

Colcannon and St. Patrick’s Day

Fun fact: St. Patrick’s Day falls during the Lenten season for Christians but the restrictions on eating and drinking alcohol are lifted which is one of the reasons that the holiday is associated with rowdy behavior. Another thing you may not know about Irish culture is that Colcannon is not only a traditional Irish dish, it is also a song!

This recipe was created in partnership with We Olive. 

If you are are interested in hearing more about Ireland you may want to check these posts:

Colcannon vertical image for Pinterest

Welsh Rarebit

Welsh Rarebit with arugula salad

When I was a kid I thought Welsh rarebit was dish featuring rabbit. I don’t know why, I just did. Did you?  I also thought that the expression ‘making ends meet’ referred to a recipe for dinner. I am embarrassed to tell you that I was well into adulthood before I figured out that Welsh rarebit is another name for fancy cheese toast and cheese toast is something that I can get 100% behind.

My intention for this post to gather some background information about why the recipe is called Welsh rarebit and I started with Wikipedia and surprise!  It sounds like many people thought Welsh rarebit was made with rabbit meat. Perhaps I wasn’t such a dummy when I was a kid.

Welsh rarebit - Wikipedia

But now I know better and I want to make sure that you know about Welsh rarebit and that you try and fall in love with it like I have. I mean toasted bread with cheese sauce ladled over it. C’mon, what is not to love?

Welsh Rarebit-5

I love to use slices of leftover baguette to make Welsh rarebit. If you slice the bread on a diagonal you will get a little more toasty surface to soak up the cheese sauce. I like to melt a little butter to a cast iron skillet and then add the slices of bread. Cook until golden and then flip to toast the other side.

Toasting bread for Welsh rarebit

Remove the toast from the skillet and place on a plate while you make the cheese sauce. Adding beer, Worcestershire sauce, and dry mustard add savory notes to the cheese. I recommend using sharp cheddar for a little extra punch. Adding an egg yolk to the cheese sauce at the very end also makes the sauce rich and silky.

How to Make Welsh Rarebit

I like to serve Welsh rarebit alongside an arugula salad that is lightly dressed with olive oil, a squeeze of fresh lemon juice, sea salt, and fresh cracked pepper. The combo is delicious! 


If Welsh rarebit sounds good, you may also like these recipes:

Welsh rarebit vertical image


Green Papaya Salad

Green Papaya Salad

Thai food lovers rejoice! If you love Green Papaya Salad (sometimes called Som Tum on Thai menus) you will be excited to learn that it is very easy make at home. Green Papaya salad is light, healthy, and so fresh tasting. It is one of my favorite Thai dishes whether I am dining at a Thai restaurant or cooking Thai food at home.

If you live near an Asian market, you can make this Thai restaurant favorite quickly and easily. If you haven’t ever ventured into an Asian market or any ethnic market for that matter, here is an article I wrote about why you should.

Green Papaya Salad overhead shot

First, go to the produce section. Asian markets have incredible produce, much of it may be new to you. Typically, there are an amazing array of greens, mushrooms, and potatoes. But, today you will want to look for a green papaya which looks like a dark green football. Green papayas are unripe papaya, so, instead of sweet orange flesh the unripe flesh is crisp. If you cannot find green papayas locally, you can substitute cucumbers which are similar in texture albeit more watery.

Another important part of this recipe is the serrated peeler. Using this peeler will result in thin strips of vegetable similar to julienne slices. Serrated peelers can be found on Amazon and at Asian markets. You will use the serrated peeler on the green papaya and carrots. If you have a mandonline slicer you can also use the julienne blade to slice the veggies.

Once the veggies are sliced, you just need to combine the dressing ingredients in a small bowl or Mason jar. Thai food always focuses on the balance of flavors between sweet, sour, salty, and spicy. This dressing combines all those flavors for a nicely balanced dressing.

Pour the dressing over the veggies and toss to combine. Garnish with chopped peanuts and fresh herbs before serving.

Green Papaya Salad aka Som Tum

Carrot Scallion Coriander Salad

3/4 shot of carrot scallion coriander salad

Have you seen the beautiful colorful carrots in the market lately? I have been seeing bags of full-sized colorful carrots for a while now in grocery stores. But, just recently I have seen bags of colorful baby carrots too. So, recently I picked up a few bags of those colorful babies and wanted to figure out a way to showcase their bright colors in a crisp carrot salad.

In case you were wondering, the colorful carrots while a bit bling-y taste just like orange carrots but the range of colors are best showcased in raw carrots. Cooking or roasting the carrots will mute their vibrancy a little. Fortunately, no cooking is necessary for this recipe. All you need to do is a little slicing and chopping.

Overhead shot of two plates of carrot scallion coriander salad

You know that I am a mandoline slicer evangelist. I use this kitchen tool ALL THE TIME! For example, here are a few recipes which are a breeze to make when you use a mandolin: Golden Beet and Cucumber Salad, Maple Walnut Crostini and Spicy Cucumber Salad with Peanuts.

How to Make Carrot Scallion Coriander Salad

But, back to this deliciously crisp and colorful carrot scallion salad. You can make the dressing ahead of time if you like. I toasted raw walnut pieces for a few a few minutes in a small pan on the stove top. Toasting the nuts brings out the flavor so don’t skip this step. I used my mandoline to slice the radishes and carrots. Instead of slicing the carrots into rounds, I held the carrots on the side and sliced them into ribbons. Don’t you think they look pretty?

Once your veggies are sliced, place them on a platter. You can also make four individual plates of salad if you prefer. Next drizzle the dressing evenly over the veggies and then top with walnuts. If you are a walnut fan you could substitute a different nut. I think pistachios would be very nice too.

Carrot Scallion Coriander Salad

Golden Beet and Cucumber Salad

Two plates of golden beet and cucumber salad

Sometimes the simplest food is the best food. I certainly think that this is the case with this Golden Beet and Cucumber Salad. I am an advocate for menu planning and grocery lists. But, sometimes you have to go to the market and buy what looks fresh and amazing. This was the case last weekend when I spied the most beautiful golden beets. The beets were small and their greens were incredibly lush and vibrant. I knew I had to build a salad recipe where the beets were the star.

So, the first thing that I did when I got home was removed the beet greens, ran them through the salad spinner, then separated the stems from the leaves. I sautéed the stems with onion and garlic until tender, added the thinly sliced leaves until wilted, and finished the greens with red pepper flakes, and a splash of red wine vinegar. I enjoyed the greens with some mashed potatoes. So good!

Overhead shot of golden beet and cucumber salad

But, enough about the beet greens, let’s get to the Golden Beet and Cucumber Salad. Trim both ends of the beets and peel to remove skin. I always use care when peeling the beets because I want to keep the round shape and avoid angular edges.

I like to use Persian cucumbers for this salad. They are small, sweet, and tender. If you can’t find Persian cucumbers you can substitute English (aka hothouse) cucumbers. If you must use regular cucumbers be sure to peel them and consider removing the seeds.

Thinly sliced radishes add a little heat and peppery crunch to the salad. If you hate radishes, then feel free to omit them from the dish. But, I like the contrast of flavor and color.

Golden Beet and cucumber salad

This Golden Beet and Cucumber Salad comes together so quickly if you use a mandoline. I use these mandoline from OXO several times per week. I ordered here from Amazon (affiliate link) It slices vegetables so thin that it is ridiculous. Most humans couldn’t achieve that thin slice with a knife.

Here are few other beet recipes that you may enjoy:

Golden Beet and Cucumber long vertical image for Pinterest

Chili Lime Salmon Tacos

Plate with three chili lime salmon tacos

It doesn’t need to be a Tuesday for me put tacos on the menus. Every single day is a perfect day for tacos in my book. Currently, I am crushing so hard on these Chili Lime Salmon Tacos.

Did you hear the news? US News & World Reports released their 2018 assessment of diets. Any guesses on what diet came in first? The Mediterranean diet tied for first among a panel of nutritionists, dietary consultants and physicians specializing in diabetes, heart health and weight loss. Tied for first with the Mediterranean diet is the DASH diet which is a diet recommended by many doctors to help control blood pressure.

Tray with two chili lime salmon tacos Curious to hear what diets didn’t fare as well? Spoiler alert: Keto and Whole 30 both brought up the rear end of the analysis. So for the love of all things holy, please stop focusing on these diets. In what universe could it possibly make sense that a steak is health food and lentils are bad? It just doesn’t make any sense. For once and all, can we agree that whole grain carbs are not the enemy? Seriously, they are not.

How to Make Chili Lime Salmon Tacos

Alright, stepping off my soapbox now and moving on from the ranting to the recipe for these Chili Lime Salmon Tacos. All you the salmon needs a little seasoning in the form of salt, pepper, and chili powder and a few minutes on the either the grill or skillet. Watch the fish closely while it is on the heat. You don’t want to overcook it.

Overhead shot of plate of chili lime salmon tacos

The fish will change color moving from the bottom which is in contact with the heat moving upward. Once it gets about one-third of the way up the fillet flip it over to the other side. The second side will cook quickly so remove from the heat when the cook line starts moving up. The fish will continue to cook even after it is removed from the heat.

Let the salmon rest while you cut up the veggies and make the spicy cilantro sauce. Once your other ingredients are prepped just break the fillets up into bite-sized chunks and assemble your tacos.

Other salmon recipes you may want to check out:

Long vertical image of chili lime tacos with words overlaid for Pinterest

Cheddar and Cranberry Chutney Crostini

Cheddar Cranberry Chutney Crostini 9

It isn’t just the alliteration that I love about these Cheddar and Cranberry Chutney Crostini. I also love how you can transform a few simple ingredients into a festive and delicious bite. These crostini would be perfect when you have friends coming over for a drink or to accompany a pot of soup.

Let’s start at the base. For the crostini you can both buy a baguette and make your own by slicing it up, brushing each slice with a little bit of olive oil on both sides, and seasoning with salt. To crisp up the slices, just pop the slices under the broiler or on a grill for a few minutes be sure to flip during cooking so that both sides are crisp.

Another option is to buy sliced, crisped cocktail toasts at the grocery store. These packages are usually found near the deli section. They are great to have in your pantry and can be topped so many different ways for easy appetizers.

Cheddar Cranberry Chutney Crostini-12

Once you’ve decided on your crostini base your next choice will be to consider the cheese.  I know it says cheddar in the title but there are so many things to think about! Firstly, do you like mild, medium, or sharp cheddar? I love sharp cheddar and think it pairs well with the cranberry chutney. But, if you prefer mild then by all means, go with mild cheddar. I used white cheddar when I took these photographs because I thought it would look pretty but yellow cheddar is perfectly fine.

Now to the fun part! Chutney. I am not going to lie. I love chutney. I always have some at the ready to add to a cheese plate or add some zing to grains or rice side dishes. Chutney is easily made by combining your ingredients (typically, fruit, nuts, and spices) into a small saucepan and simmering until the fruit softens and the mixture of flavors comes together. In this case, the cooking time on the chutney is about 15 minutes.

How to Make Cheddar Cranberry Chutney Crostini

Cheddar Cranberry Chutney Crostini-2

The last step is an assembly job. Line a baking sheet with parchment and place the crostini on the parchment. Add a slice of your delicious cheddar to the crostini and pop into the oven until the cheese melts. Remove from the oven and add a dollop of chutney to each crostini. You can finish it off with a bit of parsley (you can parsley your crostini a little less aggressively than I did if you wish).

Some other appetizer recipes that you might want to check out:

Cheddar Cranberry Chutney Crostini Pin

Page 2 of 10

Powered by WordPress & Theme by Anders Norén