The Passionate Pursuit of Delight

Course: Main Dish Page 1 of 5

Halloumi and Grilled Veggie Salad

Halloumi and Grilled Veggie Salad

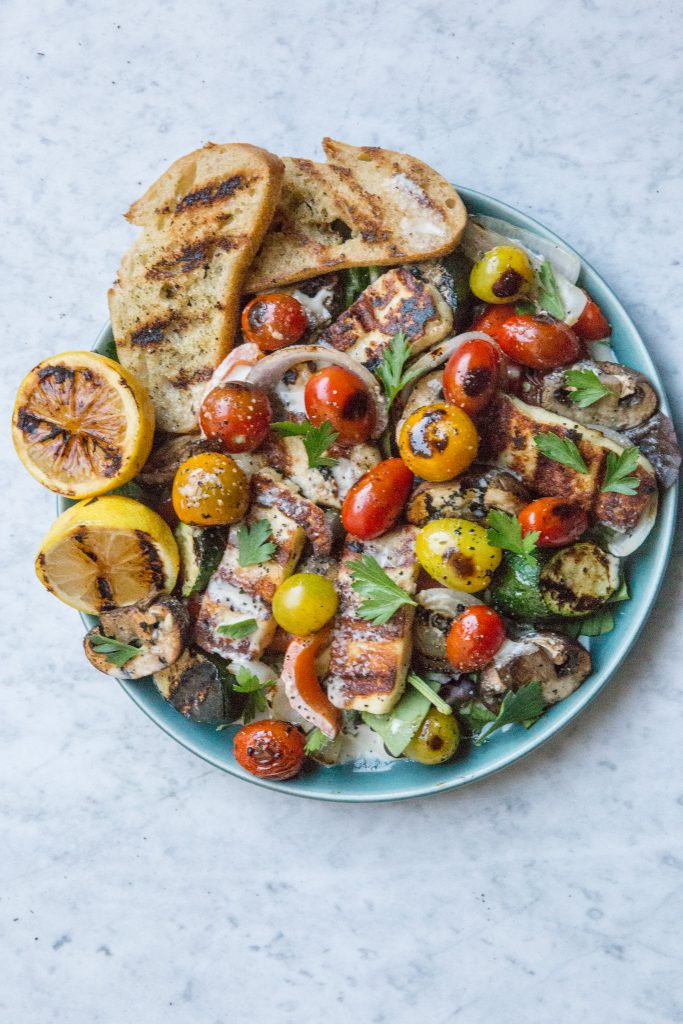
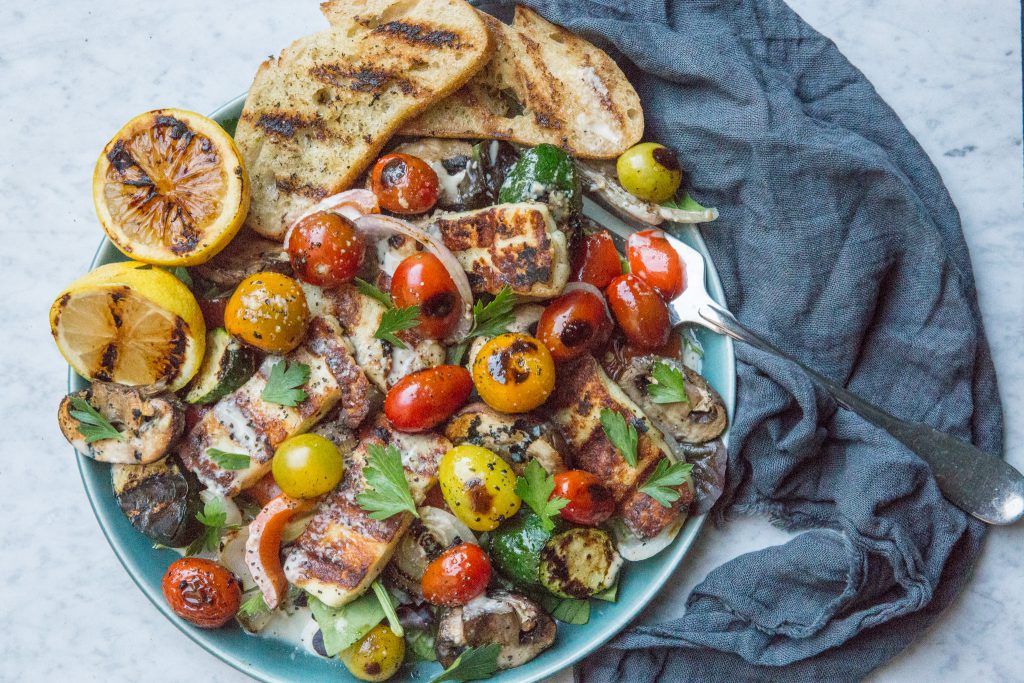
Adding grilled veggies and halloumi to salad greens makes this salad hearty and delicious. The halloumi and vegetables can be cooked outside on the grill or indoors on the stove-top in a grill pan.

Halloumi is sheep and goat’s milk cheese from the island of Cyprus. A unique characteristic of halloumi is that it has a high melting point making it ideal for grilling or pan-frying. When halloumi makes contact with a hot grill or pan, the exterior begins to turn golden brown and the interior becomes soft.

If you can’t quite wrap your head around grilling the halloumi on a grill, check out this video of Curtis Stone showing you how it is done. Grilling cheese until it’s golden? Sign me up.


To make the grilled veggie and halloumi salad, slice 8 ounces of halloumi into 1/2” slices. For the vegetables, prepare one peeled red onion by cutting into wedges. Cut the two zucchini into thick slices, one red pepper into thick strips, and eight mushrooms cleaned and halved. Place veggies, halloumi, olive oil, salt, and pepper in a large bowl stirring to coat all the ingredients.

Halloumi and Grilled Veggie Salad-4

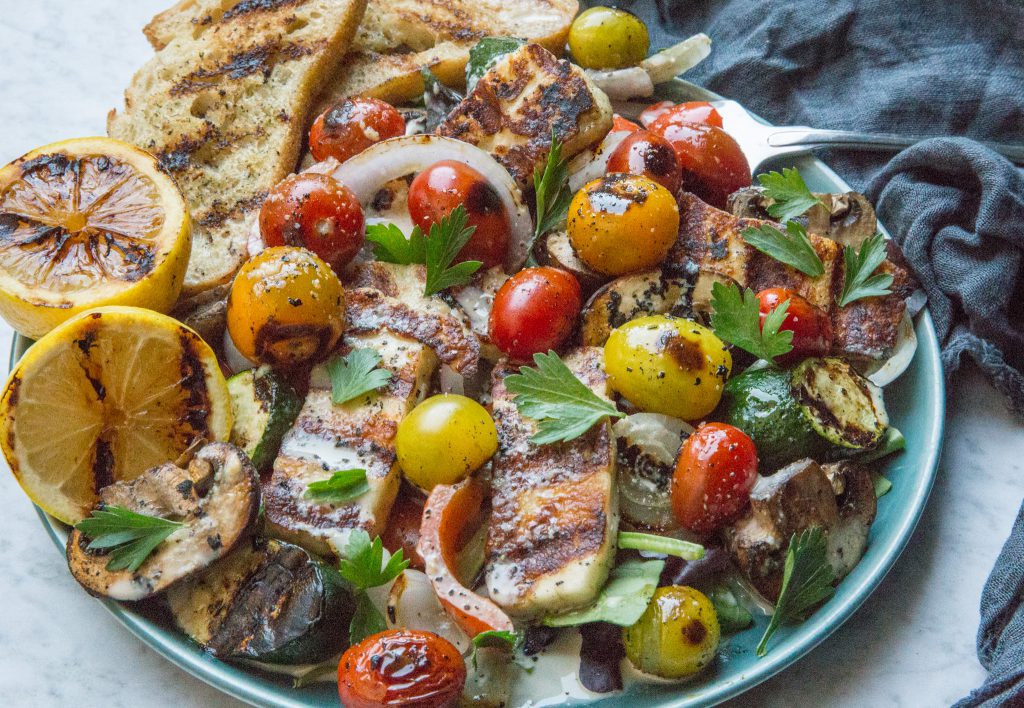
Next, in a small bowl whisk together 3 tablespoons of tahini, 2 tablespoons water, 1 tablespoon balsamic vinegar, 1 tablespoon maple syrup, salt, and pepper in a small bowl. Heat grill or grill pan to medium-hot. Cook veggies and halloumi in batches, turning once until charred. Place both halves on the lemon on the grill and cook until you can see grill marks on the lemon.

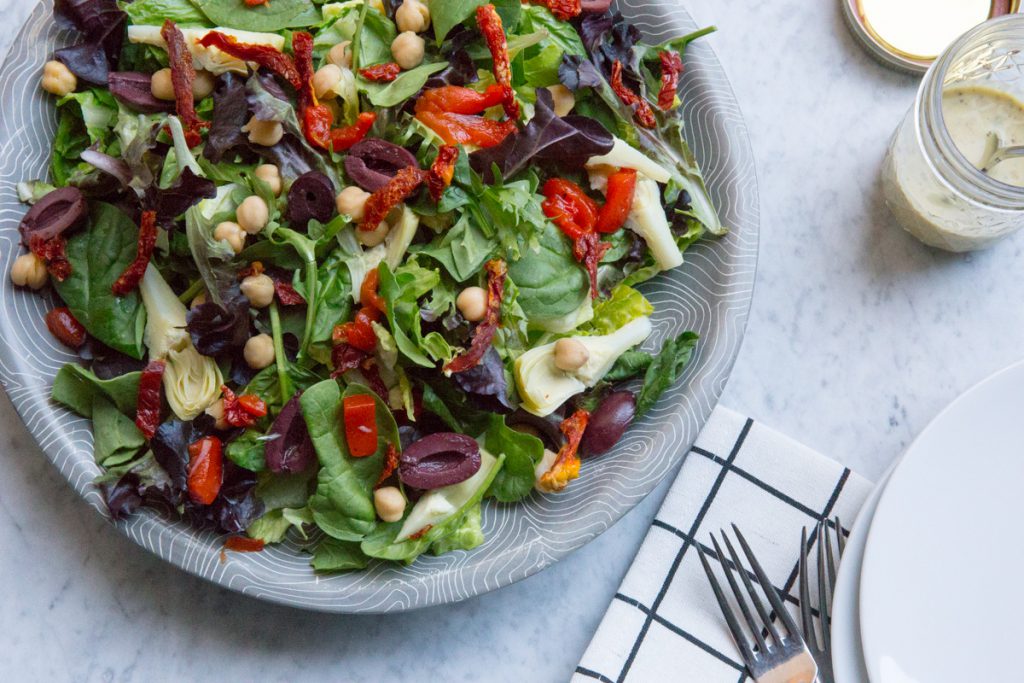
Arrange salad greens on a large platter, top with grilled veggies, halloumi, tahini dressing and fresh parsley. Season to taste. Squeeze grilled lemon over salad. Serve immediately.

Other veggie-forward meals that you may want to check out:

Vertical image Halloumi and Grilled Veggie Salad-1

Burrata Caprese Salad

Overhead shot of Burrata Caprese Salad

Traditional Caprese salad is made with fresh mozzarella and tomatoes. But, when tomato season is in full swing, I like to kick my Caprese salad up a notch by using heirloom tomatoes and burrata. Heirloom tomatoes offer a dizzying array of colors, shapes, and textures, plus they are delicious. Burrata is fresh mozzarella which is stretched thin and flat. Then a mound of a cream is placed in the center and the mozzarella is wrapped around the creamy center. It is decadent, delicious, and definitely worth seeking out! So, give Burrata Caprese Tomato Salad a try.

What is Burrata?

This year I found a nursery that grows a huge variety of heirloom tomato starts. I spent half of a morning walking through their greenhouses looking up pictures and information on my phone about unfamiliar tomatoes. The staff was super helpful and gave me recommendations on their favorites. Now, I am starting to see the fruit maturing into gorgeous specimens.

I always grow tons of basil. For the last few years, I have planted three basil plants which are very happy in my herb garden box. The plants end up looking like bushes, deliciously fragrant and huge bushes. I chop those babies down two or three times during the summer and make big bashes of pesto. Some of the pesto I use right away on pizzas or pastas. The rest of the pesto I freeze in ice cube trays and transfer the frozen cubes into freezer bags to use during the rest of the year.

Side angle of Burrata Caprese Salad

But, I am going off on a little bit of tangent here, aren’t I? Back to the heirloom tomato and burrata Caprese salad. I like to slice up the large tomatoes into slices, cut the medium-size tomatoes into wedges and half the small or cherry tomatoes. I like to use a variety of shapes and colors and lay the tomatoes pieces out on a platter.

Then, I take the burrata and rip it up into pieces and place them into the nooks and crannies of the tomatoes. Many people put whole basil leaves in their Caprese salad but I like to stack a bunch of basil leaves one on top of another and then roll them up into a little cigar shape. Next, I will cut the basil cigar into thin ribbons and then sprinkle the ribbons all over the tomato and burrata mixture. Doesn’t that look pretty?

To finish the salad, I drizzle olive oil and balsamic vinegar over the salad and season with salt and pepper. Delizioso!

Vertical image of Burrata Caprese Salad

How to Make Burrata Caprese Salad

Other recipes you may want to check out?

Italian Chopped Salad

Italian Chopped Salad

The dog days of summer mean salads for days. The weather is hot but this Italian Chopped Salad is cool, crisp, and delicious. When the temperatures soar I find myself craving cooling raw foods and not wanting to spend much time in the kitchen. Who can be bothered heating up the oven, clicking on a burner or even standing by a hot BBQ grill? On many summer days, I can’t.

There is no cooking involved in this Italian Chopped Salad. It only requires a bit of chopping and assembling. You can even prep the salad ingredients and dressing ahead of time. Then, you just need to take a few minutes to assemble the salad. Viola! Dinner is served.

Italian Chopped Salad

How to Make an Italian Chopped Salad

The steps necessary to make an Italian Chopped Salad are combine crisp Romaine lettuce with a few handfuls of colorful spring mix salad greens for a beautiful base.

For the chopped part of the salad, rinse and drain a can of artichoke hearts and then halve or quarter them depending on their size. You want to have bite-size pieces. No awkward large pieces! For the roasted red pepper, I cut it once around the equator (horizontally around the middle) and then into thin strips.

Halve the olives. Be sure to use nice olives for this salad. Skip the canned olives. Kalamata olives are typically sold in glass jars and have better taste and texture than the canned counterparts. Drain and rinse the chickpeas and then toast the pine nuts.

Italian Chopped Salad

To make the dressing, in a small bowl or Mason jar, combine olive oil (or tahini if you are trying to reduce processed oils), mustard, apple cider vinegar, honey, Italian seasoning, salt, pepper, and garlic. Shake or whisk to combine.

I like to serve the Italian Chopped Salad on a large platter or bowl. Then, layer the greens, artichoke hearts, roasted red pepper, olives, and chickpeas, toss salad with dressing and top with toasted pine nuts. I like my salads to be lightly dressed so add about half the dressing then toss. You can always add more but you can’t take any out once you’ve poured it on!

Here are few other salads that you might enjoy

Pesto Pizza with Caramelized Onions and Burrata

Pesto Pizza with Caramelized Onions and Burrata

I don’t know what I could possibly say to let you know how much I love melted cheese on a crispy crust of bread. You have heard me ramble on pizza in such posts as Portobello Mushroom Pizza, Pizza with Morel Mushrooms and Green Onions, Smoke Mozzarella Lemon Pizza, and Zucchini and Peach Pizza with Basil. At the time that I wrote those, believe me, they were my favorite pizza. But now, I am deep in love with Pesto Pizza with Caramelized Onions and Burrata.

Do any of you get into ruts with food? I do. Sometimes I can’t help myself. I just start thinking about the decadent creaminess of burrata, the herby garlic flavor of pesto, and the sweet taste of tomatoes and onion. So, I don’t stop thinking about it and before I know it, I have made this pizza three times in a month.

Pesto Pizza with Burrata and Caramelized Onions-3

Readers of this blog will know how I feel about burrata cheese. For those of you just stopping by, burrata is fresh mozzarella which is stretched and then wrapped around a gooey center of creamy deliciousness. That is the official definition.  It adds a luscious bite to recipes. If you aren’t lucky enough to live near a market that sells burrata, fresh mozzarella is a good substitute.

I typically use a pizza stone when baking a pizza at home. The stone absorbs the heat so when the dough makes contact it simulates the affect that happens in a wood-fired pizza often. The result is a crispy slightly charred crust. So good.

Here’s a quick video about using a pizza stone to cook pizza at home.

How to Make Pesto Pizza with Caramelized Onions and Burrata

Pesto Pizza with Burrata and Caramelized Onions-7

Portobello Mushroom Pizzas

Portobello Mushroom Pizzas

I love pizza. Let me be very clear, I could eat pizza every single day of my life. I am not necessarily proud of that fact but it is the truth. For me, there is no greater comfort than warm, melted cheese stretching from the plate to my mouth. Bring it on.

But honestly, sometimes I don’t feel like messing around with dough. I am one messy cook, I get flour everywhere even if I am only rolling out store-bought dough. Enter Portobello mushrooms. They are perfect stand-ins for pizza crust. Mushrooms are hearty and meaty and their cup shape perfectly holds sauce, cheese, and any toppings that you enjoy.

Portobello Mushroom Pizzas

For a quick and easy weeknight dinner use jarred or canned tomato sauce. I use for mozzarella for its ability to melt into stringy gooeyness, provolone for its flavor, sand parmesan for its sharp bite. I like the combination of cheeses but you can skip the provolone and I still think you will be happy with the result.

For the toppings of this Portobello mushroom pizza, I love sun-dried tomatoes and pine nuts with a drizzle of balsamic vinegar, a pinch of crushed red pepper flakes, and ribbons of basil. But, you can swap out these toppings for anything that you prefer.

Portabello Mushroom Pizza-8

I also love olives and onions. Sometimes I use pesto for the sauce instead of marinara sauce. I have a stash of pesto in my freezer from last summer’s bounty. I freeze the pesto in an ice cube trays. Make these your own with your favorite toppings or whatever you have on hand.

The secret to pump up the flavor of the Portobello mushrooms is brush them with a garlic butter mixture before you fill them with sauce and toppings and pop them in the oven. Trust me, it is delicious.

Other mushroom recipes you may be interested in:

Portobello Mushroom Pizza

Eggplant Parmesan

Eggplant Parmesan-8

Are you an eggplant lover or an eggplant hater? People seem to fall firmly into one camp or the other. Growing up in an Italian family, eggplant was a staple on our dinner table. That purple beauty was most commonly served in the form of eggplant parmesan.

Fun fact, when my son was a little boy he called eggplant ‘the punching bag fruit’. I still think that this is the cutest thing ever. The punching bag fruit. When buying eggplants at the market you want to look for ones that have smooth purple, shiny flesh and that feels heavy for its size.

Breaded eggplant slices

If you are feeling unsure of how to buy and prepare eggplant you can check out this video. For eggplant parmesan, I don’t typically salt the slices of eggplant but I do if the eggplant will be used in a dish that isn’t covered in sauce and cheese.

There are as many variations of eggplant parmesan as there are Gambino families. Some family recipes call for slicing the eggplant thick, some thin, some peel the eggplant, and others don’t. Then there is the fry their eggplants slices devotees versus the eggplant slice bakers. Personally, I like my eggplant peeled, thinly sliced, coated in panko, parmesan, and baked.

Finished pan of eggplant parmesan

The process of making eggplant parmesan isn’t that much different than making lasagna. Instead of layering noodles, you layer slices of eggplant with marinara and seasoned ricotta cheese. This recipes calls for two eggplants and will fill a 9 x 13 pan but you can also just use one eggplant and bake it in a 9 x 9 or small round casserole.

Side view of eggplant parmesan

This may sound weird to anyone who didn’t grow up in an Italian family but leftover eggplant parmesan makes a divine filling for a sandwich. But, the bread must be a crusty loaf of Italian bread or a baguette if you don’t have good Italian bread in your part of the world.

How to Make Eggplant Parmesan

Other Italian recipes you might enjoy:

Eggplant Parmesan

Pasta with Garlic and Olive Oil

Pasta with Garlic and Olive Oil-7

Pasta with garlic and olive oil is the easiest weeknight dinner. Ever. Even stopping for take-out is a bigger hassle than making this bowl of pasta. Plus, it’s cheaper and made with ingredients that are actually food. All that aside, I recently realized something shocking. Despite being raised Italian and having a deep love of pasta, I have never posted a pasta recipe here at Hello Fun Seekers! How is that even possible? I rectify that oversight today.

I also have to say that I have never bought into the low-carb phenomena. My great-grandmother lived until she was 96 and my grandmother will be 100 later this year. Believe me, those ladies had pasta as a staple in their diets. So, eat your cauliflower crusts if you want but I will be over here enjoying a delicious bowl of pasta.

Pasta with Garlic and Olive Oil-5

Fusilli is one of my favorite pasta shapes. The curlicues aren’t just pretty to look at but they create numerous nooks and crannies for the sauce to adhere to as well. Properly cooking the pasta is crucial. You will often here people talk about cooking it al dente, ‘to the tooth’, meaning that it still has some texture. There is nothing worse than overcooked mushy pasta.

In order to avoid overcooking the pasta, I typically finish cooking my pasta in the sauce which serves an important purpose. To accomplish this, I boil the pasta for a minute or two less than what the package instructions recommend. Finishing the pasta in the sauce allows the pasta to soak up the sauce and infuse the pasta with all that flavor.

The order of operations for this dish is to start your pasta cooking and then start the sauce. Speaking of the sauce, this pasta is for garlic-lovers only and although it is quick to make it does require your careful attention for a few minutes. Garlic burns easily and can scorch quickly so have all your ingredients prepped when you start cooking.

Pasta with Garlic and Olive Oil-3

The simplicity of the ingredients and the balance of flavors are what make this pasta special. The olive oil is luxurious, the crushed red pepper provides a spicy kick, the squeeze of lemon juice brightens up the sauce, and finally, the Italian parsley adds a touch of freshness.

I hope you will try this classic pasta and let me know what you think.

How to Make Pasta with Garlic and Olive Oil

Pasta with Garlic and Olive Oil

Shakshuka

Shakshuka-4

Shakshuka has an unusual name that may not roll off the tongue easily at first but believe me once you make this you will be shakshuka-ing all the time. Shakshuka is a dish that is popular in North Africa and the Middle East. Basically, the dish consists of eggs poached in tomatoes, onions, red peppers, and various spices.

Shakshuka is incredibly versatile and can be served for dinner or brunch. Most of the ingredients are pantry staples and from start to finish you can make this meal in just over 30 minutes. Plus, when you are done your kitchen will smell like heaven. I kid you not.

Shakshuka-25

One unusual element of this dish is using a large can of whole, peeled tomatoes. I like to pour the whole can into a large bowl and crush the tomatoes by hand before adding them to the skillet.  This process adds not only the terrific flavor from the whole tomatoes but provides the sauce a beautiful rustic texture.

But, be warned, wear an apron or clothes that you don’t care about because it is a messy process. If you hate messes you could also use a pastry blender to break up the tomatoes. But, why not bring out your inner Lucille Ball and smash those babies up like an Italian grandma? Check out this video. This woman gets me.

Having bread to soak up the sauce is crucial. My preference is a nice crusty loaf or fresh warmed pitas. A crisp green salad would round out the meal perfectly.

Last year, a few Hello Fun Seekers readers and I all made shakshuka simultaneously and live-tweeted our progress on Twitter. It was really fun! Would you all be interested in doing something like that from time to time? Let me know in the comments below if you think that sounds like fun.

How to Make Shakshuka

Shakshuka

Parmesan Garlic Clams

Parmesean Garlic Clams overhead shot

I used to feel intimidated by the thought of cooking clams. How do I store them once I get home? What do I need to do to prep them for cooking? It all seemed somewhat overwhelming. But, you know what they say, you should do one thing every day that scares you. I am so glad that one day I decided to face my fear and figure out how to cook clams. Boy, am I glad that I did because these Parmesan Garlic Clams are now part of my repertoire.

Besides fresh clams, the key to this type of preparation is having a flavorful broth to cook the clams in. In order to make Parmesan Garlic Clams, you will use butter, white wine, and broth as the base and shallot and garlic for flavor. A pinch of crushed red pepper flakes add a spicy note. But, a crucial part of this dish is having a crusty baguette available to soak up that delicious broth.

Parmesean Garlic Clams-18

The most important part of the process is getting clams that fresh and have been properly handled. I only buy fresh clams from my fish market or local grocery store whose fish department has a reputation for selling high-quality, fresh fish.

Clams should smell like the ocean and their shells should be closed. Tap any partially opened shells about the counter and if they don’t close then discard them. You want the clams to remain alive prior to cooking them so leave them exposed to the air so that they don’t smother. I usually place the bag in a bowl of ice with the top of the bag left open in the fridge.

Digging for Clams

About an hour or two before you plan to cook the clams remove them from the fridge and give each clam shell a scrub with a kitchen brush. Then, gently place the clams in a large bowl full of water. Let the clams soak in the water for about an hour. They will dispel any sand or grit that is in their shells. Gritty clams are the worst so be sure to do this step. You can read this informative article from Bon Appetit about clams if you want to learn more.

I love to serve Parmesan Garlic Clams with a salad, a crisp white wine, and crusty loaf bread.

Parmesean Garlic Clams-33

How to Make Parmesan Garlic Clams

Other seafood recipes that you may want to check out:

Parmesan Garlic Clams pin


Welsh Rarebit

Welsh Rarebit with arugula salad

When I was a kid I thought Welsh rarebit was dish featuring rabbit. I don’t know why, I just did. Did you?  I also thought that the expression ‘making ends meet’ referred to a recipe for dinner. I am embarrassed to tell you that I was well into adulthood before I figured out that Welsh rarebit is another name for fancy cheese toast and cheese toast is something that I can get 100% behind.

My intention for this post to gather some background information about why the recipe is called Welsh rarebit and I started with Wikipedia and surprise!  It sounds like many people thought Welsh rarebit was made with rabbit meat. Perhaps I wasn’t such a dummy when I was a kid.

Welsh rarebit - Wikipedia

But now I know better and I want to make sure that you know about Welsh rarebit and that you try and fall in love with it like I have. I mean toasted bread with cheese sauce ladled over it. C’mon, what is not to love?

Welsh Rarebit-5

I love to use slices of leftover baguette to make Welsh rarebit. If you slice the bread on a diagonal you will get a little more toasty surface to soak up the cheese sauce. I like to melt a little butter to a cast iron skillet and then add the slices of bread. Cook until golden and then flip to toast the other side.

Toasting bread for Welsh rarebit

Remove the toast from the skillet and place on a plate while you make the cheese sauce. Adding beer, Worcestershire sauce, and dry mustard add savory notes to the cheese. I recommend using sharp cheddar for a little extra punch. Adding an egg yolk to the cheese sauce at the very end also makes the sauce rich and silky.

How to Make Welsh Rarebit

I like to serve Welsh rarebit alongside an arugula salad that is lightly dressed with olive oil, a squeeze of fresh lemon juice, sea salt, and fresh cracked pepper. The combo is delicious! 


If Welsh rarebit sounds good, you may also like these recipes:

Welsh rarebit vertical image


Page 1 of 5

Powered by WordPress & Theme by Anders Norén