The Passionate Pursuit of Delight

Ingredient: pepper Page 2 of 4

Cheddar and Cranberry Chutney Crostini

Cheddar Cranberry Chutney Crostini 9

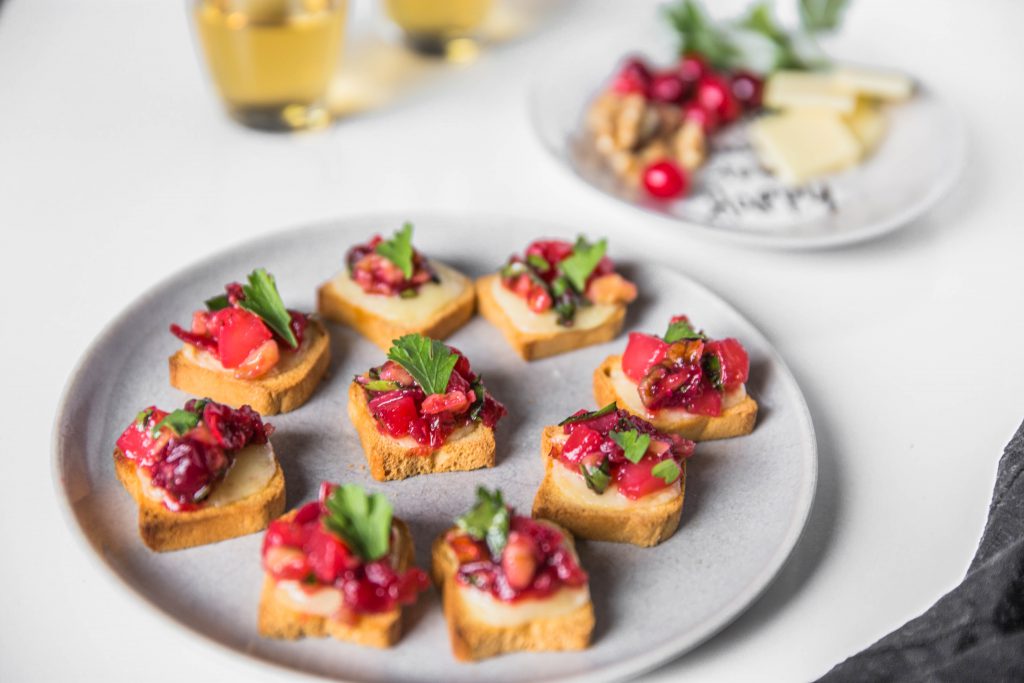
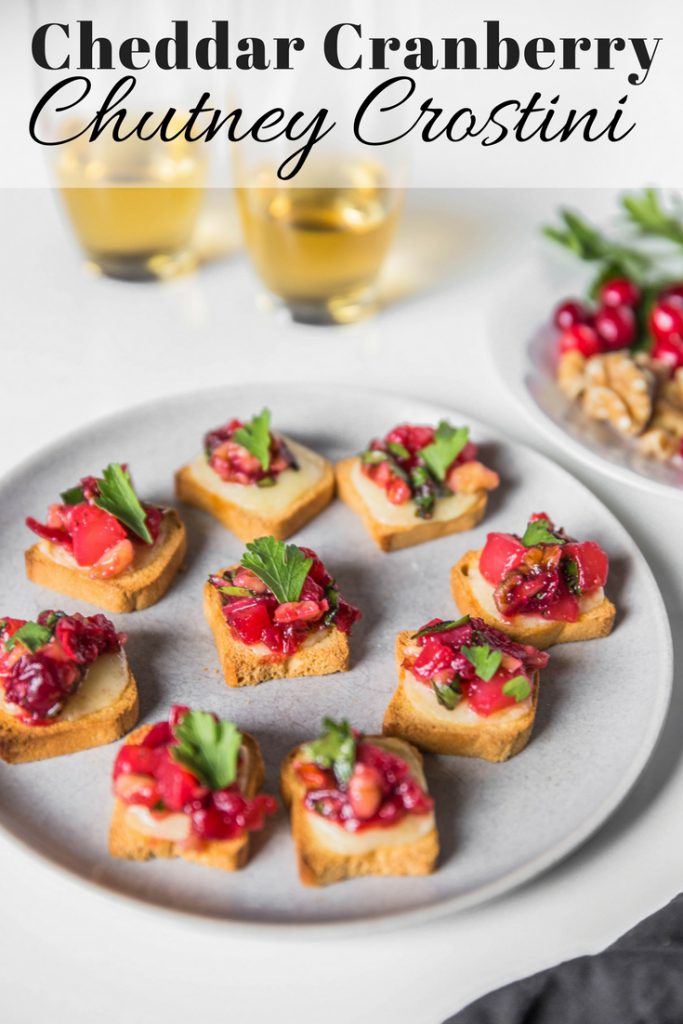
It isn’t just the alliteration that I love about these Cheddar and Cranberry Chutney Crostini. I also love how you can transform a few simple ingredients into a festive and delicious bite. These crostini would be perfect when you have friends coming over for a drink or to accompany a pot of soup.

Let’s start at the base. For the crostini you can both buy a baguette and make your own by slicing it up, brushing each slice with a little bit of olive oil on both sides, and seasoning with salt. To crisp up the slices, just pop the slices under the broiler or on a grill for a few minutes be sure to flip during cooking so that both sides are crisp.

Another option is to buy sliced, crisped cocktail toasts at the grocery store. These packages are usually found near the deli section. They are great to have in your pantry and can be topped so many different ways for easy appetizers.

Cheddar Cranberry Chutney Crostini-12

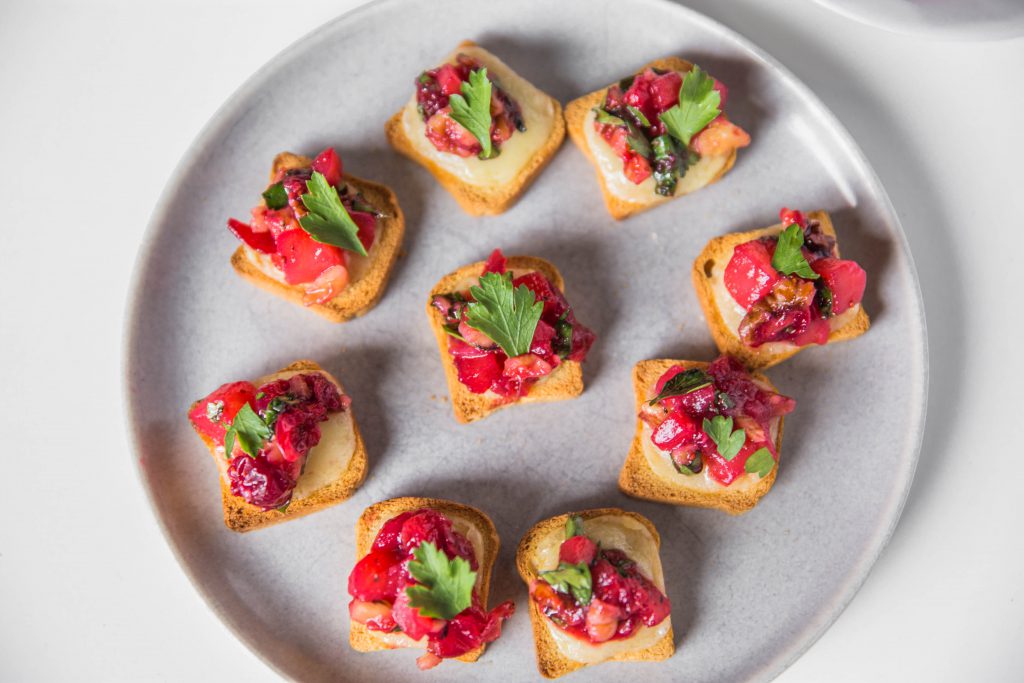
Once you’ve decided on your crostini base your next choice will be to consider the cheese.  I know it says cheddar in the title but there are so many things to think about! Firstly, do you like mild, medium, or sharp cheddar? I love sharp cheddar and think it pairs well with the cranberry chutney. But, if you prefer mild then by all means, go with mild cheddar. I used white cheddar when I took these photographs because I thought it would look pretty but yellow cheddar is perfectly fine.

Now to the fun part! Chutney. I am not going to lie. I love chutney. I always have some at the ready to add to a cheese plate or add some zing to grains or rice side dishes. Chutney is easily made by combining your ingredients (typically, fruit, nuts, and spices) into a small saucepan and simmering until the fruit softens and the mixture of flavors comes together. In this case, the cooking time on the chutney is about 15 minutes.

How to Make Cheddar Cranberry Chutney Crostini

Cheddar Cranberry Chutney Crostini-2

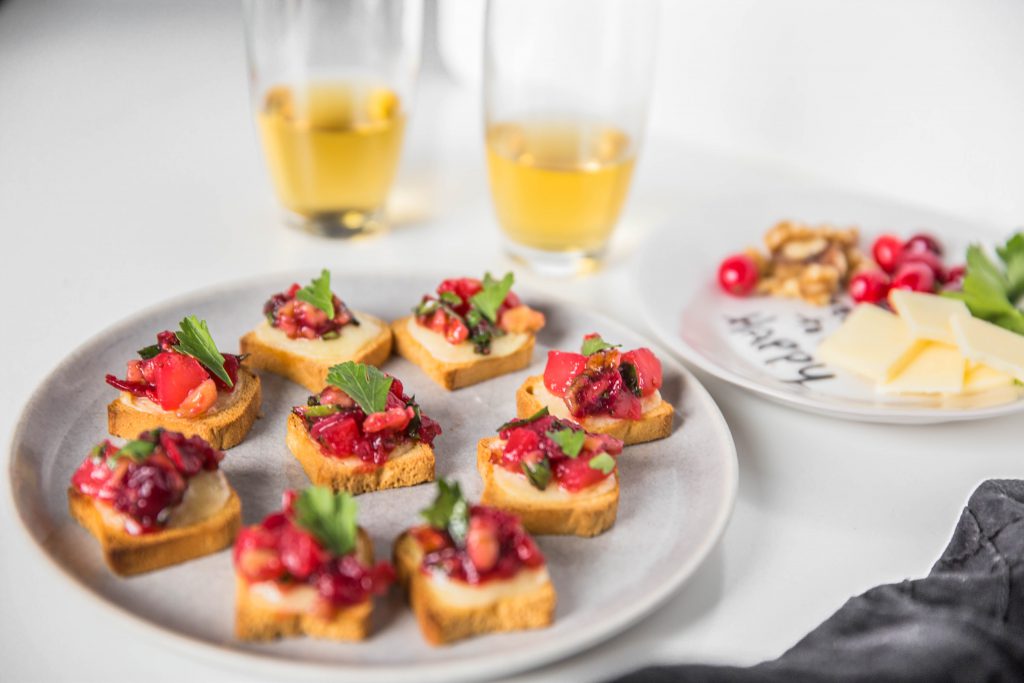
The last step is an assembly job. Line a baking sheet with parchment and place the crostini on the parchment. Add a slice of your delicious cheddar to the crostini and pop into the oven until the cheese melts. Remove from the oven and add a dollop of chutney to each crostini. You can finish it off with a bit of parsley (you can parsley your crostini a little less aggressively than I did if you wish).

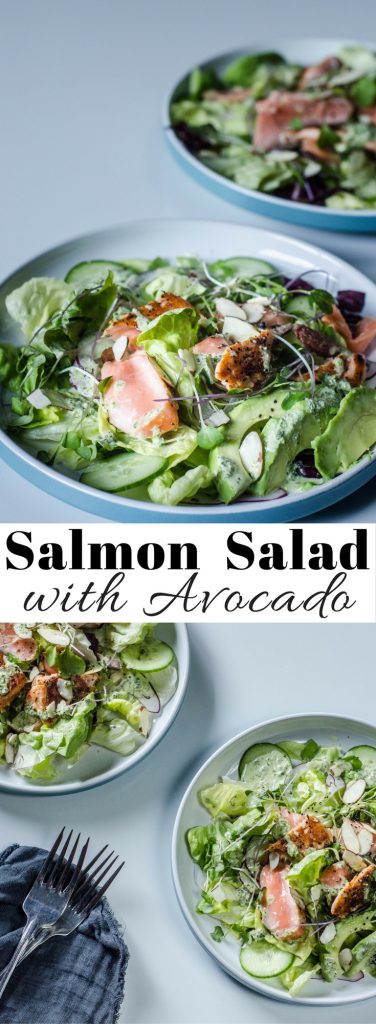
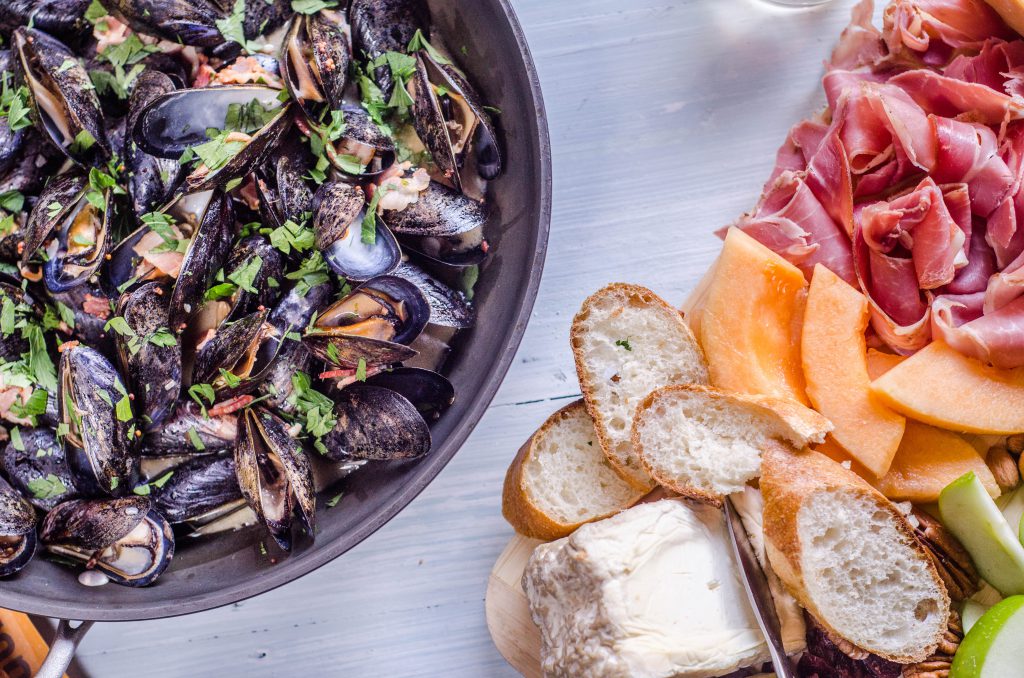
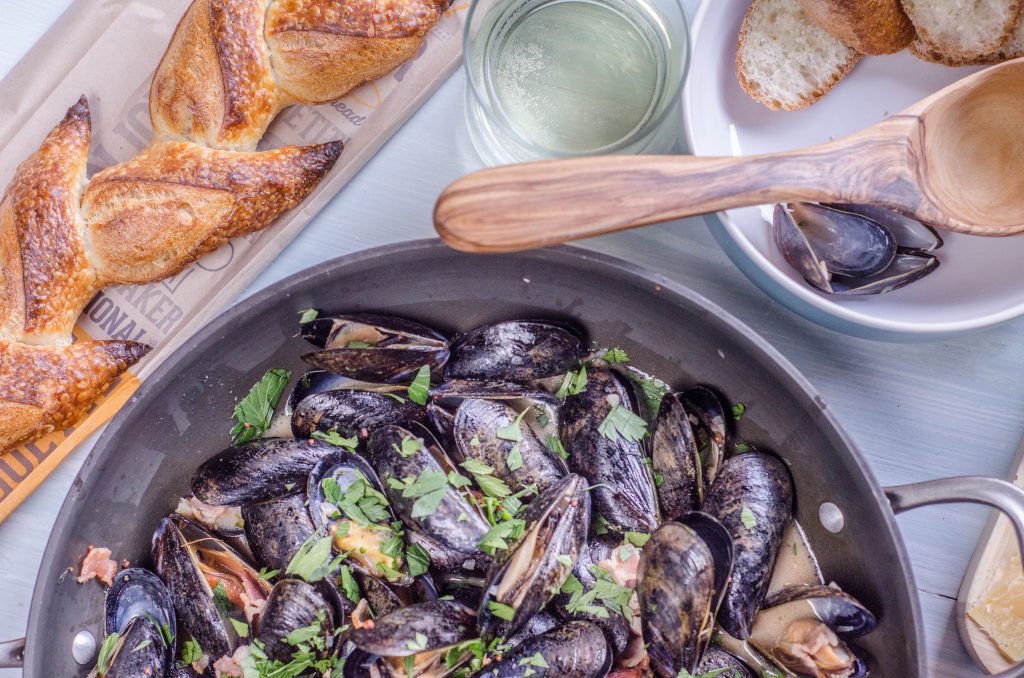
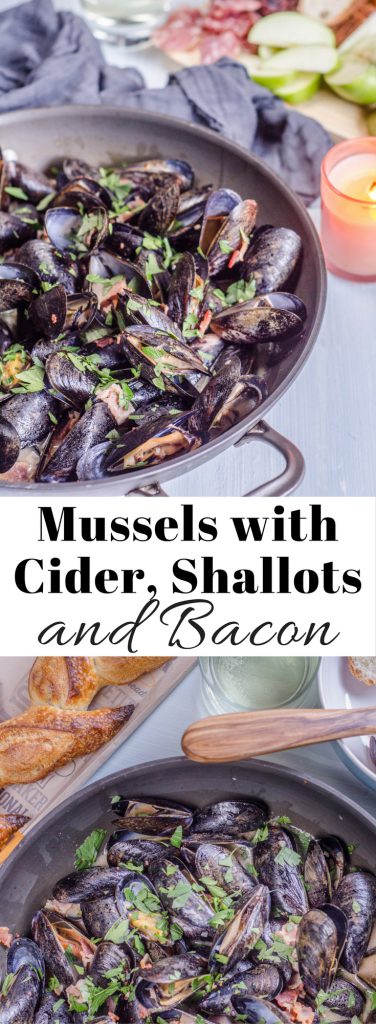
Some other appetizer recipes that you might want to check out:

Cheddar Cranberry Chutney Crostini Pin

Crispy Artichoke Hearts with Lemon Aioli

Crispy Artichoke Hearts with Lemon Aioli

Artichokes have always been part of my family’s holiday traditions. As long as I can remember, my Grandparents would fly into town for Thanksgiving and my Grandmother would always make stuffed artichokes. Whole artichokes were ‘stuffed’ with breadcrumbs, parmesan cheese, and seasoning then steamed for 45 minutes. So, these crispy artichoke hearts with lemon aioli are a nod to her and my family’s Italian ancestry. Equally as delicious but much quicker to prepare and cost effective because you use frozen artichoke hearts instead of fresh whole artichokes.

Don’t get me wrong, I love whole artichokes and still cook them from time to time but I have fallen for this preparation of crispy artichoke hearts with lemon aioli as one of my go to appetizers. Another thing that I love about this recipe is that you can keep all the ingredients on hand fairly easily so no running to the store at the last minute because your friends are doing a pop in this evening for a drink. Doesn’t that sound good?

Crispy Artichoke Hearts with Lemon Aioli 3
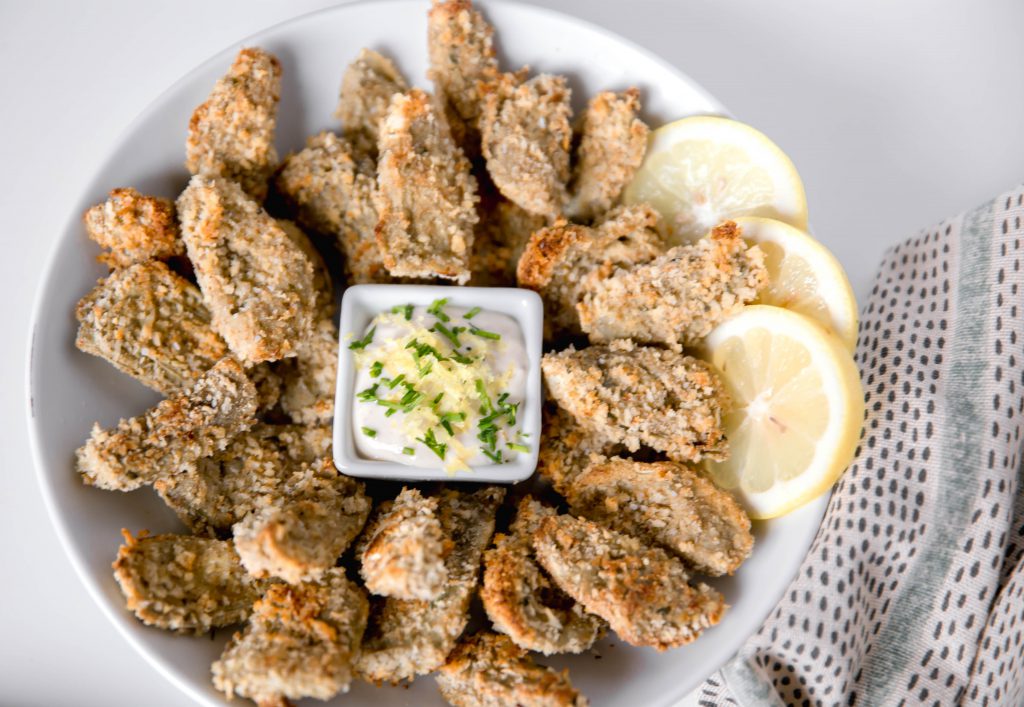
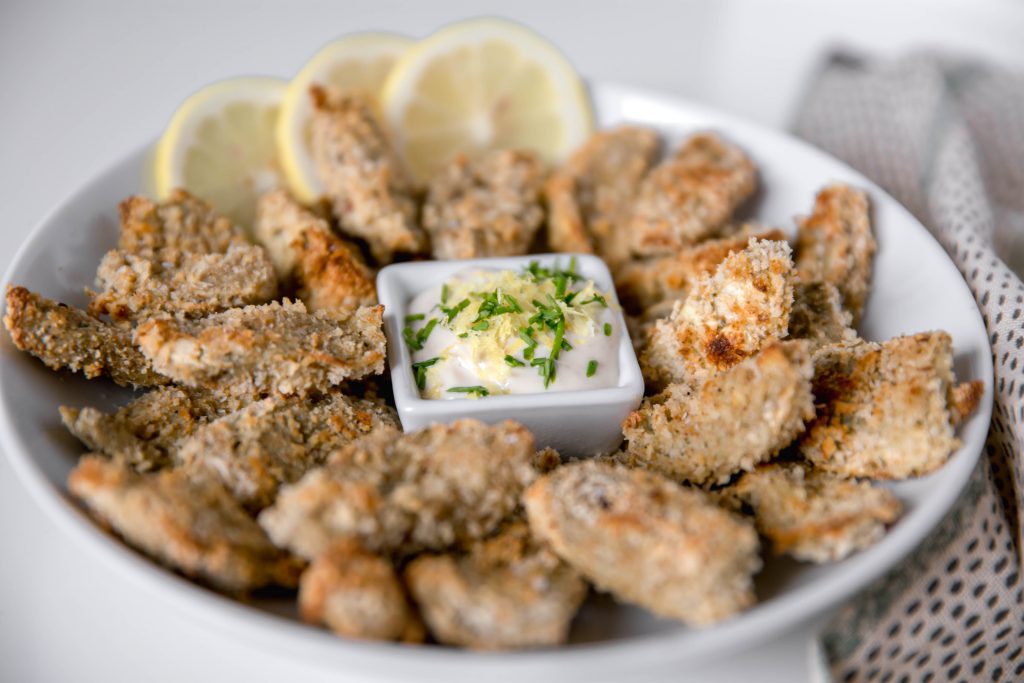
But first, I want to talk for a minute about growing artichokes in your garden. Have you grown them? Have you seen them growing in someone else’s garden? One of my friends had a neighbor who had them in her garden and they were rather magnificent. Check out the video below to see what they look like in the wild. Well, not the wild but not in the grocery store or Costco.

Okay, back to crispy artichoke hearts with lemon aioli. I keep a bag or two of artichoke hearts in my freezer all the time. With a simple egg wash, a dunk into bread crumbs, a quick bake in the oven, you can have an elegant appetizer ready in less than thirty minutes. Be sure to check out my recipe for Asparagus and Artichoke Frittata if you want more artichoke recipes.

You will also want a dipping sauce for these crispy bites. There are two sauces that I love to serve with crispy artichoke hearts. One is a lemon aioli which is luscious and a great companion for the artichokes. You can also serve them with marinara sauce which is a little bit lighter than aioli.

How to Make Crispy Artichoke Hearts with Lemon  Aioli

Whether you decide to dip in aioli or marinara sauce or both, let me know if you try these crispy artichoke hearts. You can be sure that I will be serving these up this holiday season.

Crispy Artichoke Hearts with Lemon Aioli

Wild Rice Salad

Wild Rice Salad overhead
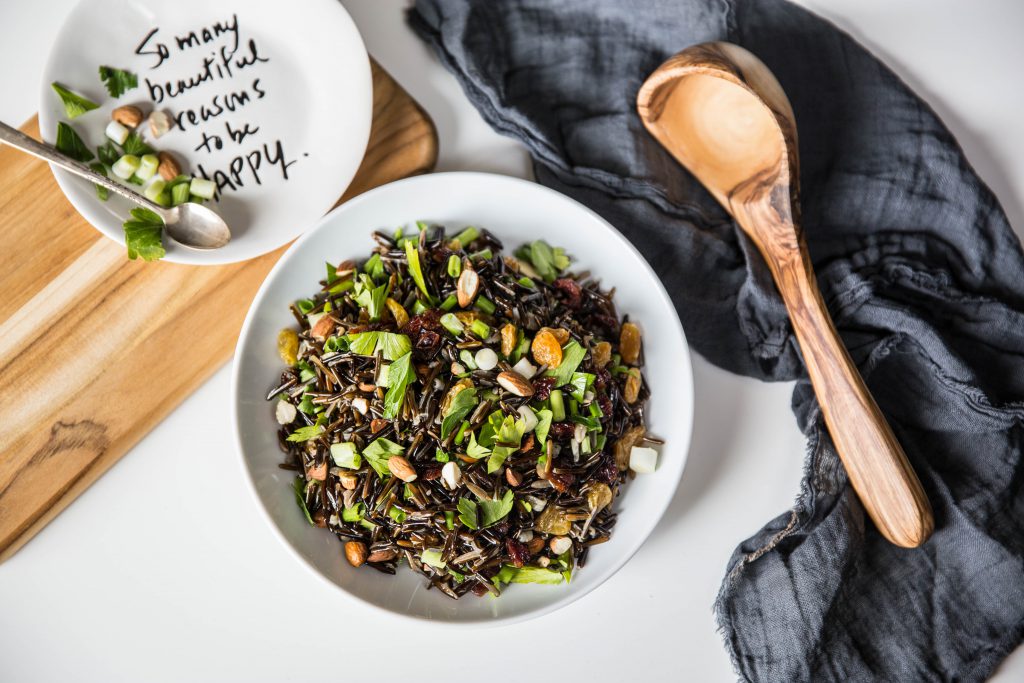
How much time do you spend thinking about rice? I mean, where does it come from? Do you know how it grows and is harvested? I must admit that I hadn’t given it much thought until I read Amy Thielen’s Give a Girl a Knife and she talked about her husband harvesting wild rice near their home in Minnesota. Be sure to check out the video below that shows two guys in a canoe harvesting wild rice. You will never look at wild rice the same again.

Inspired by the harvesting process, I picked up a bag of wild rice at Trader Joe’s. Wild rice is low-carb and gluten-free, so this wild rice salad might be a welcome addition to your Thanksgiving table. Which brings up a topic that I am endlessly curious about, Thanksgiving menus. Are you a traditionalist or do you like to mix it up with new recipes?

I have always been a new recipe kind of girl and didn’t realize how contentious that could be for people. Who knew that replacing the traditional green bean casserole with haricots vert with a lemon almond gremolata could have ruined Thanksgiving for some of my family members a few years back? Oops!

Wild Rice Salad Vertical Shot
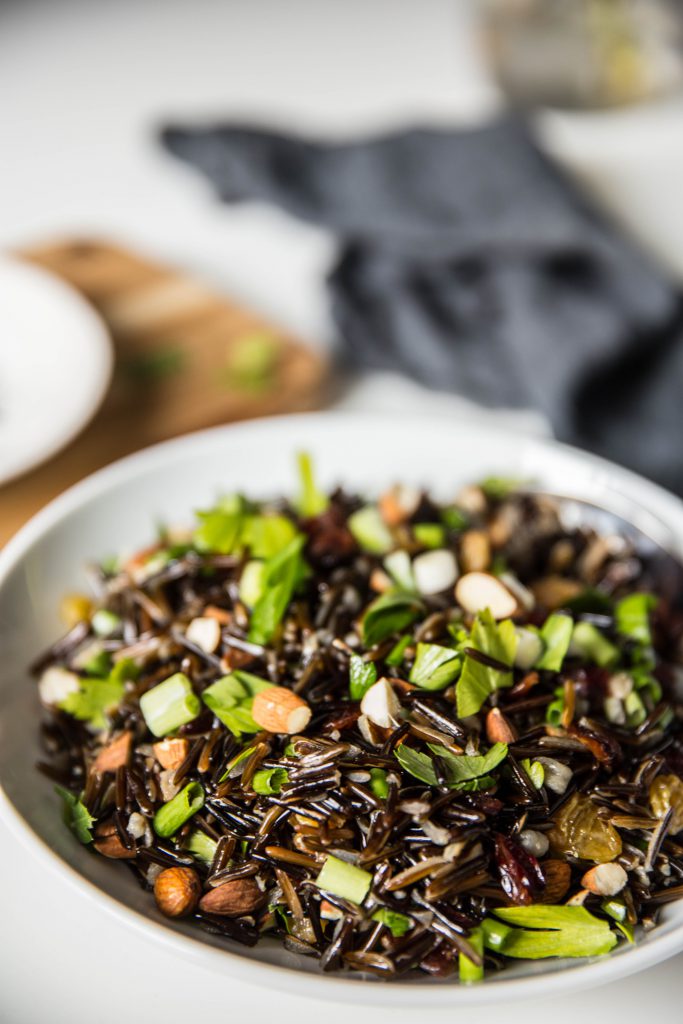
Wild rice has a chewy texture and nutty taste and makes a hearty base for this salad. Truth be told, when I created this recipe recently it was because I needed a dish to bring to a potluck gathering. My goal was to make a dish using only ingredients that I had on hand so I wouldn’t have to go to the grocery store. The good news is that most of these ingredients are pantry items that you might have in your kitchen.

I will cut to the chase, this wild rice salad got great reviews!  The dried fruit adds a little bit of sweetness to the salad while the green onions and parsley add freshness. The almonds lend some crunch.  Whether you make this for a potluck or for Thanksgiving, the good news is that you can make it a day ahead of time. I think it tastes better after sitting for a day. If you make it ahead of time, I would reserve a little bit of fresh parsley to garnish the salad just before serving.

How to Make Wild Rice Salad

If you are looking for other holiday recipes, check out:

Wild Rice Salad Long Image for Pinterest

Salmon Salad with Avocado

Salmon Salad with Avocado overhead shot

There is nothing like a plate of salmon and greens that just makes you feel healthier for eating it. I sometimes feel as if I deserve a medal when I make this Salmon Salad with Avocado. We all know how important it is to increase the amount vegetables in our diets but did you know that salmon has its own set of health benefits? Just enter the search terms ‘salmon’ or ‘omega-3’ into Google Scholar to see how salmon can reduce inflammation, has anti-oxidants, improve the vascular system, among other benefits.

But we aren’t here to talk about nutrition and health benefits. We are here to talk about deliciousness and this salmon salad with avocado does not disappoint. I like to cook the salmon in a cast iron skillet. Check out my recipe for Pan-seared Salmon for details on the technique. Or, you can also cook the salmon outside on a BBQ. When I prepare salmon, I typically just season the fillet with salt and pepper to let the flavor of the fish shine through.

Salmon Salad with Avocado side view

For the greens, I love the flavor and texture of a spring or mesclun mix. When I make a salad, I like to think about incorporating various flavors and textures. The avocado adds a rich creaminess to the dish. The cucumber and sprouts bring freshness to the recipe. The red onion provides a bite and almonds give the salad some crunch.

While salmon is the star of this dish, green goddess dressing is the leading lady. It is super easy to make and tastes so incredibly fresh when you make it at home. Use a mixture of herbs to maximize the taste of the green goddess dressing if you make it yourself. I love chives, parsley, and basil but use what you have. I typically use this recipe for green goddess dressing when I make salmon salad with avocado but you can use whatever dressing you favor.

Salmon Salad with Avocado single plate

I would love to hear about what ingredients you like in your salmon salad. Let me know in the comments below. I am always on the hunt for inspiration.

How to Make Salmon Salad with Avocado

Check out these other salmon recipes:

Salmon Salad with Avocado long pin


Beer Cheese Soup

Beer Cheese Soup-1

You probably know that Wisconsin has the lock on any beer cheese soup recipe. Heck, Wisconsin most likely has the lock on anything to do with beer or cheese in general. But, here I am, offering up my own version of beer cheese soup with a little bit of western flair. Please forgive me Midwesterners, we just want in on some of the beer cheese soup fun.

Beer cheese soup is a fall essential. It is perfect to have on cool autumn weekends whether you have just finished raking leaves, picking apples, or watching football. I make a pot of soup every weekend and enjoy having leftovers for the work week ahead. For me, a bowl of soup is ideal for a quick weeknight dinner or equally awesome to take to work for lunch.

Beer Cheese Soup-5

Sometime during my 30s, my body decided that it no longer could handle milk or cream in any form. So, instead of using half and half to add a creamy element to the soup, I made cashew cream using this recipe. If you are not bothered by cream you can use it instead but I really do love cashew cream.

You can choose your favorite cheddar for beer cheese soup. I typically go with sharp cheddar because I love the flavor but if you or your people prefer a more mild cheddar by all means go with that. I do feel as though having some sort of bread to dip into the soup is essential.

Beer Cheese Soup-7

I was wowed by the photogenic quality of this beautiful baguette but also think soft pretzels would be fantastic to serve with beer cheese soup. I have used this recipe to make soft pretzel bites before and they were delicious and perfect for dipping. But, I am eyeballing this recipe for everything soft pretzel bites. Don’t you think they would be fantastic with beer cheese soup? I love everything that is everything flavored. By the way, have you tried the ‘everything but the bagel’ seasoning at Trader Joe’s? Recommended.

How to Make Beer Cheese Soup

Beer Cheese Soup pin

Pan-seared Salmon

Pan-seared Salmon in skillet

The last quarter of the year always means decadence, celebration, parties, events, and on and on. While I enjoy it immensely, sometimes you just need to take it all down a notch and do your body a favor. So, I like to have some easy-to-prepare, healthy recipes in my back pocket for times when all the abundance is too much.

Salmon fillets perfectly fit the bill for those times. One of my favorite techniques for cooking salmon is to pan-sear it in a cast iron pan. The technique is simple and results in a picture-perfect sear on the fish. There are just a few key steps to successfully searing salmon.

Pan-seared Salmon on a plate

First, you want to pat dry both sides of the salmon, moisture is the enemy of a good sear. Secondly, heat a neutral oil such as vegetable oil or avocado oil in a cast iron skillet until the oil shimmers. I used to feel intimidated by the idea of using a cast iron skillet. There’s the seasoning of the pan, the no soap cleaning, and oiling it after use. It seemed to be more bother than it was worth for me. But, my sweetie changed my mind about cast iron and showed me the ropes. Now, I love cooking in it.

Here is a short video from Bon Appetite’s Test Kitchen which shows how to care for cast iron.


The last step for a perfect pan-sear is to place the fish in the hot oil and use a flexible spatula to press the fish down for 10 seconds. The fish will start to curl when it hits the hot pan. You want to make sure the whole surface stays in contact with the pan. That is what ensures a nice sear.

Pan-seared Salmon close-up

To accompany pan-seared salmon, I choose whatever veggies are in season.  In the fall and winter, I like to steam broccoli or broccolini topped with a splash of lemon. In the spring, asparagus is a lovely accompaniment and during the summer I will use green beans or squash. I often will oven-roast potatoes to round out the meal.

Pan-seared salmon pin

Mussels with Cider, Shallots, and Bacon

Mussels with Cider, Shallots, and Bacon

If you have a large pot and a few pounds of mussels, you can have a dinner party worthy meal on the tables in no time at all. Mussels are one of the easiest meals to prepare. All you need to do is give the mussels a quick scrub and soak, cook up a few aromatics for a broth to steam the mussels in, and five minutes cooking time. For Mussels with Cider, Shallots and Bacon, I decided to add some autumn flair but using apple cider instead of the more typical white wine as the base of the broth.

The website Serious Eats has a more detailed article on cleaning mussels if you would like a step-by-step guide. I have also included a video below. But, I promise, it is really easy and takes no time at all. Once you get the hang of it, you will be preparing mussels all the time!

While mussels and French fries (frites) are a popular combination in Belgium and France, I prefer to serve mussels with slices of nice bread. My favorites are a beautiful baguette or ciabatta. You will want to use the slices of bread to soak up the delicious broth.

So, let’s walk through the process. Heat a large pot over a medium flame and add oil olive and butter. When the oil and butter start to bubble, add the chopped bacon and cook for a few minutes.  Next you will add the shallots, garlics, and thyme and cook until they are soft. Finally, add the cider and mustard. Bring the broth to a boil before adding the cleaned mussels. The only need a few minutes to cook. Seriously easy, right?

Mussels with Cider Shallots and Bacon-2

If you would like a tasty beverage to accompany your mussels, I recommend either a crisp white wine, sparkling wine (bubbles go with everything), or a Belgian beer.  I love to serve this meal not only because it is delicious but it is a slow-paced meal which encourages conversation as you work your way through the mussels. Slow food at its best!

How to Make Mussels with Cider, Shallots, and Bacon

Mussels with Cider, Shallots, and Bacon Pin

Roasted Squash and Pear Sandwiches

Roasted Squash with Pear

Fall = Gourdfest. Well, around my house anyway. Each fall, we host a party where all things gourd-related are celebrated. I am talking about pumpkin beer tasting, butternut squash soup, pumpkin hummus, and roasted delicata squash with red onions. All the fall flavors make me so happy but having some of my besties in the house puts it over the top.

What my friends may not know is how many recipes I test before Gourdfest. I want the food to be as memorable as the laughs and good times that we enjoy. This year, one of my first test recipes is this Roasted Squash and Pear Sandwich. Doesn’t that sound like perfect fall food? Yet, such an unusual sandwich idea.

Roasted Squash with Pear

Let’s talk about butternut squash. Are you a fan? I was a little bit intimated by butternut squash at first. I mean, could winter squash BE any more difficult to cut through? But, I learned a little secret about butternut squash. When you are shopping for butternut squash, look for one that has long neck compared to its bulbous end.

Then, just cut through the stem end and cut again at the end of the long neck before the bulbous end. From here, all you need to do is peel the skin with a vegetable peeler. For this recipe, slice the neck into 1/2” slices.

Roasted Squash with Pear

After that, you have a decision to make, do you want to tackle the bulbous end or just chuck it into the compost bin? No judgment here no matter what you decide. Sometimes I will peel the skin off with the vegetable peeler and then use a spoon to scrape out the seeds. Other times, I won’t be feeling it at all, and will just quarter it and throw it into my compost bin.

The next component is a perfectly ripe pear sliced thin and a red onion also thinly sliced. The surprise ingredient is the miso mayo. Are you a miso fan? My first experiences with miso was in soup form at Chinese restaurants.  Miso is made from fermented soy beans. You know anything fermented is good for you, right? Gut health and all that. Miso paste can be found at Asian markets and sometimes in the ethnic food aisles or produce section of some grocery stores. Miso adds that umami flavor which is rich, deep flavor.

If you decide to buy miso paste (and you should) here is a recipe for miso soup so you can use up your stash. The video below is from The Happy Pear where twin Irish brothers post articles and videos featuring easy vegan recipes.

How to Make Roasted Squash and Pear Sandwiches

Want more sandwiches?

Roasted Squash with Pear Sandwich

Lentil Picadillo Stuffed Peppers

Lentil Picadillo Stuffed Peppers

What the heck do vegetarians eat? I hear this all the time from friends and family who want to invite someone they care about over for dinner. But, when that person is a vegetarian many cooks get stumped. Ask my Mom. She will tell you. That poor woman has two daughters are totally or nearly vegetarian and two grandkids are vegetarian. She will tell you that she hates inviting us over for dinner because she has no idea what to make. So, Mom, Lentil Picadillo Stuffed Peppers is one great alternative to consider. It is hearty enough that even carnivores (like your husband) will feel satisfied.

First, a little background about Picadillo which is a popular dish in Spain and many Latin American countries. Picadillo is typically made with ground beef, tomatoes, and a variety of spices. It is often served with rice and used a filling for dishes like tacos or savory pastries.

Lentil Picadillo Stuffed Peppers
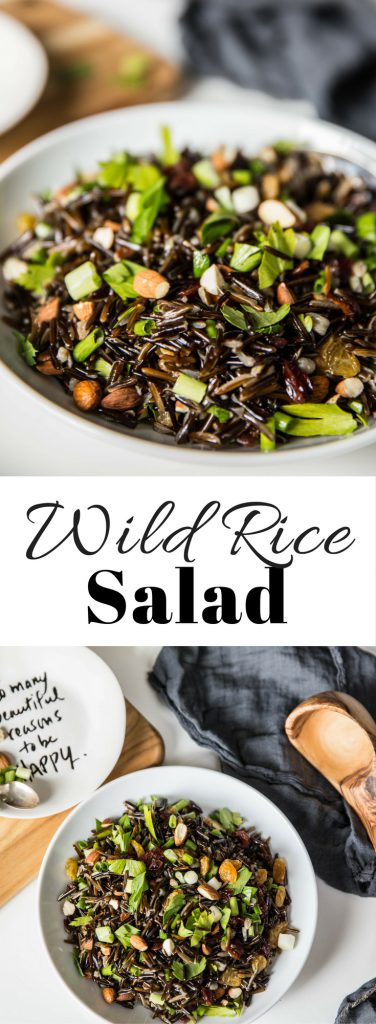
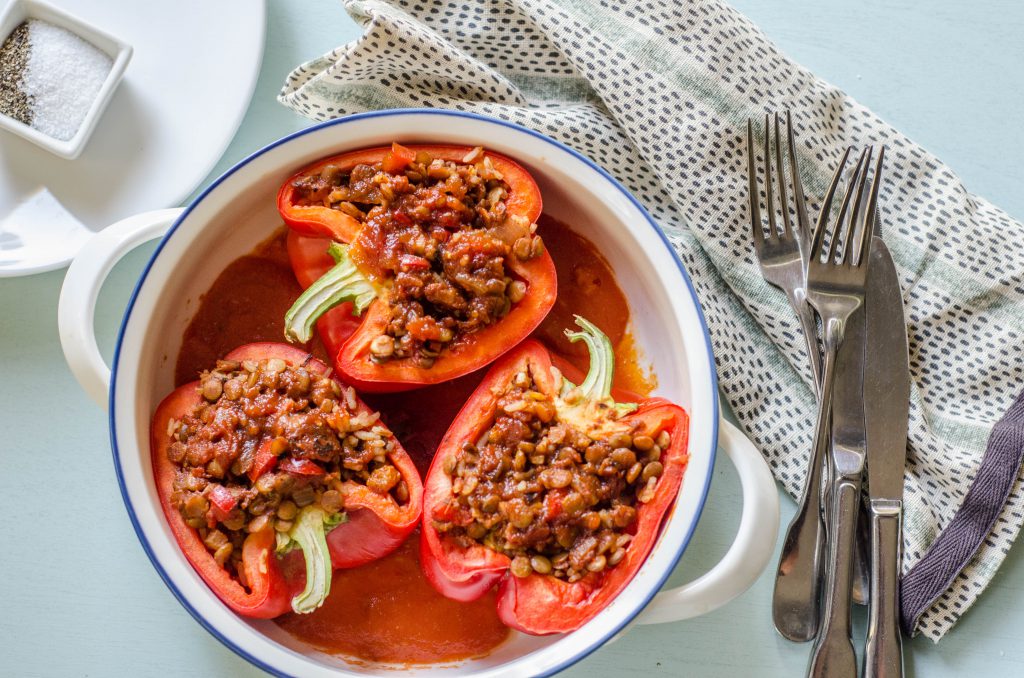
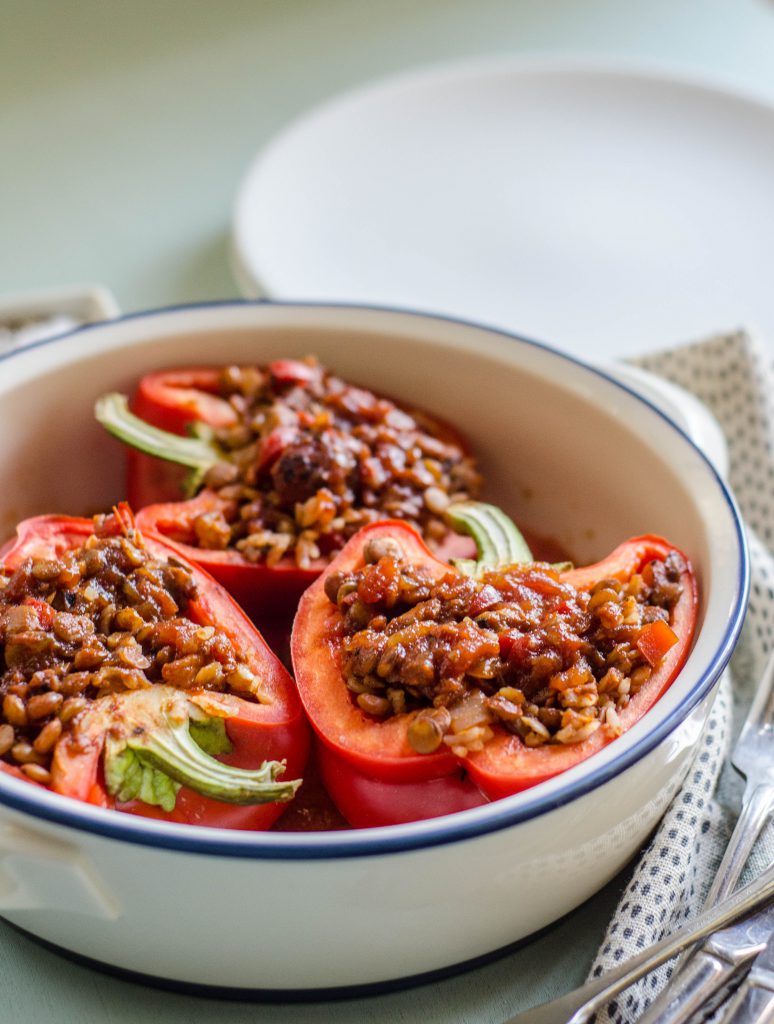
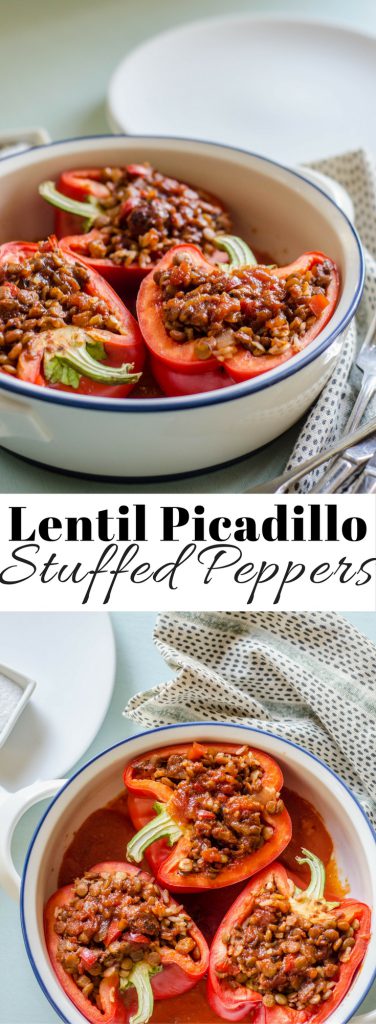
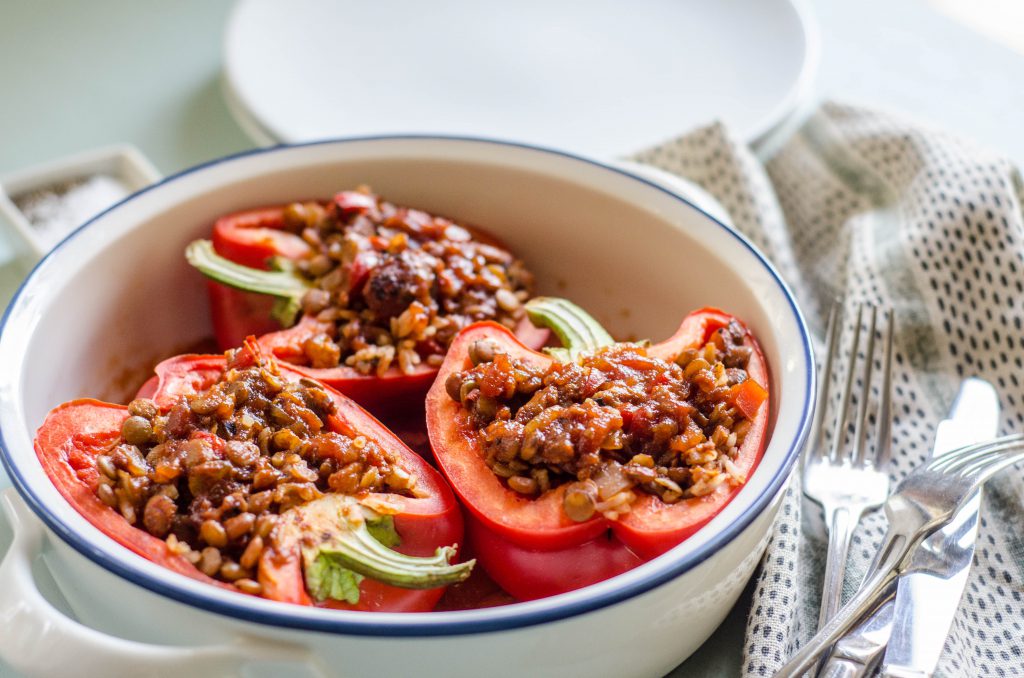
I like this healthier version of Picadillo swaps out ground beef for lentils. Lentils are inexpensive to buy, low in fat, high in fiber, and full of protein. By sautéing aromatics like onion and garlic with chili powder, cinnamon, Italian seasoning, cocoa powder, and tomatoes, you can achieve a rich flavorful broth to coat the lentils.

This version of Lentil Picadillo is most similar to the Picadillo found in Puerto Rico which includes green olives for a salty bite and raisins for a sweet chewy texture. In Puerto Rico, Picadillo is a common filling for empanadas or fritters. In this recipe, I add cooked rice to the Picadillo and stuff it inside a sweet red bell pepper before baking.

Lentil Picadillo Stuffed Peppers

Finally, lentil Picadillo Stuffed Peppers is a great make ahead meal. You could prep the Picadillo on the weekend and then on a weeknight, stuff the peppers and bake.  A healthy, homemade dinner will be on the table in under 30 minutes. What is not to love about that? Also, can you say lunch leftovers? Just try not to gloat as your coworker pulls her sad little Lean Cuisine out of the microwave.

How to Make Lentil Picadillo Stuffed Peppers

Lentil Picadillo Stuffed Pepper

Zucchini Scramble Toast

Zucchini Scramble Toast

It all started when my Mom showed up with three zucchini from her garden. She was heading out of town but her garden was still producing like crazy. Of course I could use them, no way would I let them go to waste. That is what I told both of us.

My garden has two zucchini plants so I already had zucchini pickles in the fridge. I’d made zucchini pie at least three times. Crispy zucchini chips? Yup, I had made them at several times. Chewy zucchini oatmeal cookies? I made those too.

Zucchini Scramble Toast

Coffee has a way of clearing my mind and as I sipped my morning cuppa, I eyeballed the zucchini, thought about eggs, and that day old loaf of bread on the counter and Zucchini Scramble Toast was born.

I shredded the zucchini and thinly sliced part of an onion. All the veggies needed was a quick sauté in olive oil and a little salt and pepper. Once the vegetables softened, I added a couple of lightly beaten eggs to pan and let the eggs set for about a minute before gently pushing them around the pan. Just a little more salt and pepper to the eggs and scrambled until set. Remember the eggs will continue to cook for a few minutes after you remove the pan from the heat.

Zucchini Scramble Toast

While the eggs were cooking, I toasted and buttered the bread. When the eggs were done, I divided the eggs evenly onto the toast. I sprinkled chopped tomatoes and fresh herbs on top. Chives and basil are terrific on the toast.

The beauty of Zucchini Scramble Toast is that while it is perfect for breakfast, it also makes a super quick weeknight supper. Plus, with the price of avocados these days, it may be time for the avocado toast trend to exit stage left. Who wants to help me start the next ‘toast’ fad?

So, Mom, if you are reading this, I used up all three zucchini. I hope you are having a great time on your trip and when you get home, come over for Zucchini Scramble Toast and a cup of coffee. I want to hear all about your adventures.

Zucchini Scramble Toast

Page 2 of 4

Powered by WordPress & Theme by Anders Norén