The Passionate Pursuit of Delight

Ingredient: water

Halloumi and Grilled Veggie Salad

Halloumi and Grilled Veggie Salad

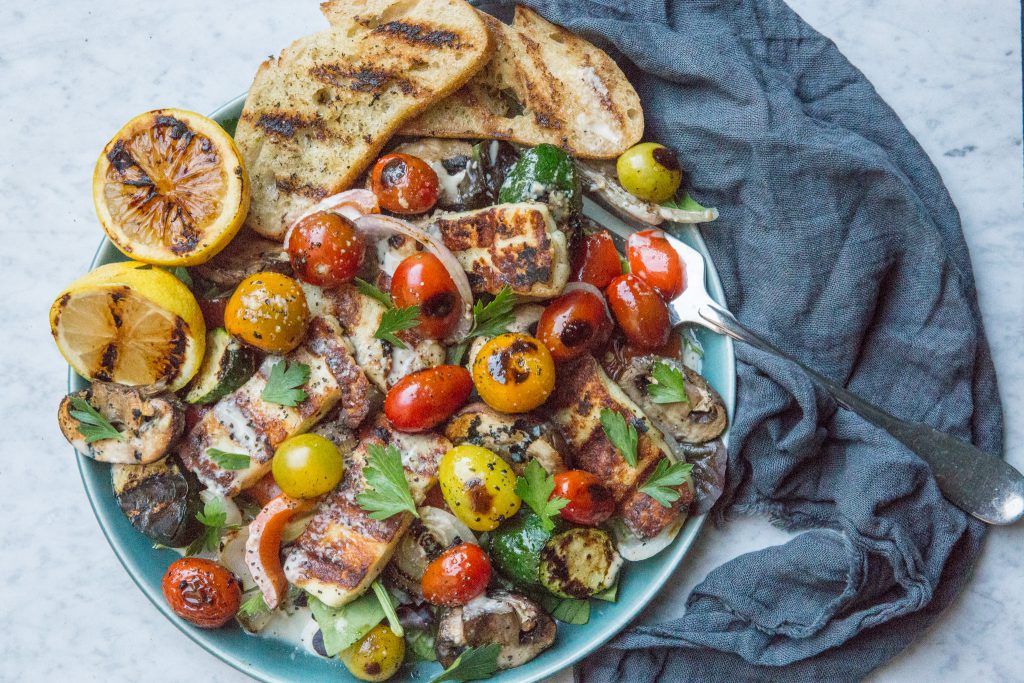
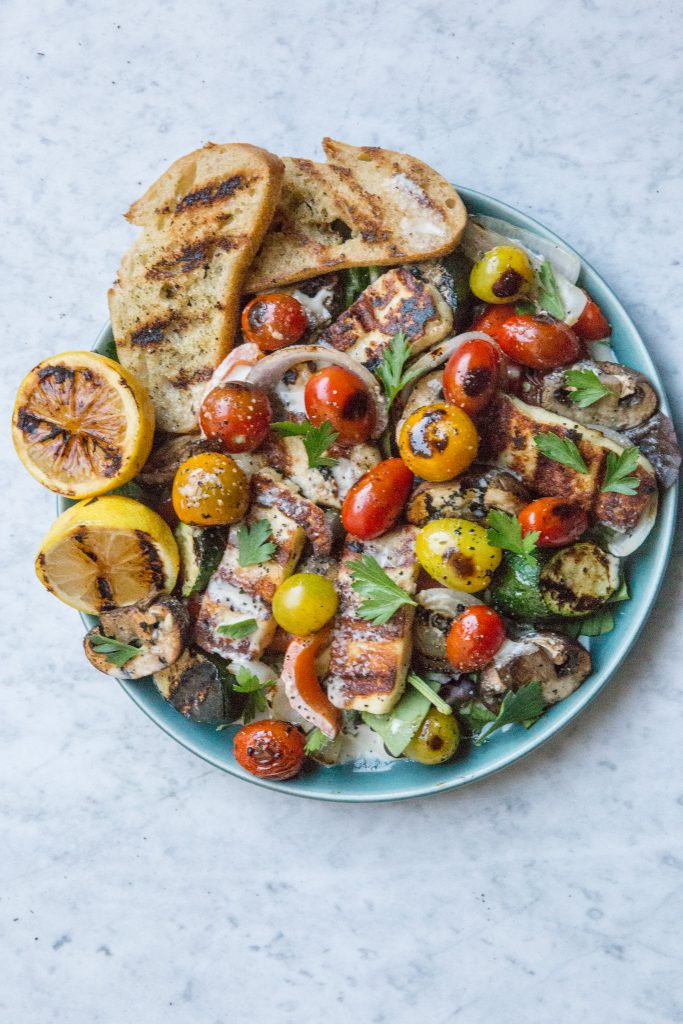
Adding grilled veggies and halloumi to salad greens makes this salad hearty and delicious. The halloumi and vegetables can be cooked outside on the grill or indoors on the stove-top in a grill pan.

Halloumi is sheep and goat’s milk cheese from the island of Cyprus. A unique characteristic of halloumi is that it has a high melting point making it ideal for grilling or pan-frying. When halloumi makes contact with a hot grill or pan, the exterior begins to turn golden brown and the interior becomes soft.

If you can’t quite wrap your head around grilling the halloumi on a grill, check out this video of Curtis Stone showing you how it is done. Grilling cheese until it’s golden? Sign me up.


To make the grilled veggie and halloumi salad, slice 8 ounces of halloumi into 1/2” slices. For the vegetables, prepare one peeled red onion by cutting into wedges. Cut the two zucchini into thick slices, one red pepper into thick strips, and eight mushrooms cleaned and halved. Place veggies, halloumi, olive oil, salt, and pepper in a large bowl stirring to coat all the ingredients.

Halloumi and Grilled Veggie Salad-4

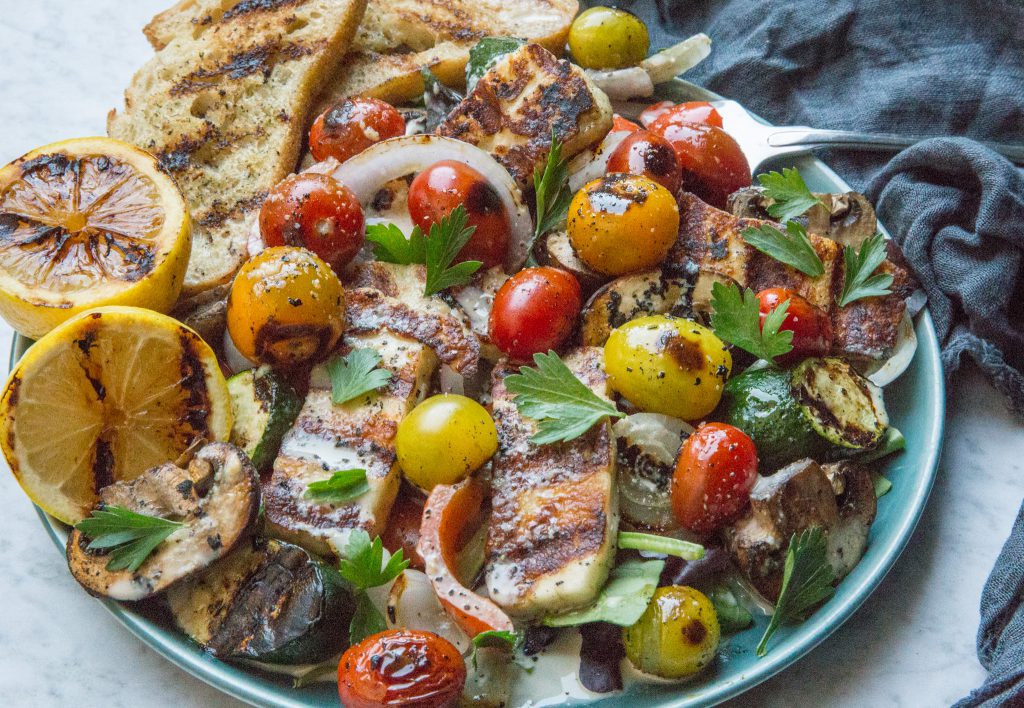
Next, in a small bowl whisk together 3 tablespoons of tahini, 2 tablespoons water, 1 tablespoon balsamic vinegar, 1 tablespoon maple syrup, salt, and pepper in a small bowl. Heat grill or grill pan to medium-hot. Cook veggies and halloumi in batches, turning once until charred. Place both halves on the lemon on the grill and cook until you can see grill marks on the lemon.

Arrange salad greens on a large platter, top with grilled veggies, halloumi, tahini dressing and fresh parsley. Season to taste. Squeeze grilled lemon over salad. Serve immediately.

Other veggie-forward meals that you may want to check out:

Vertical image Halloumi and Grilled Veggie Salad-1

Everything Pretzel Bites

Everything Pretzel Bites-1

I don’t often make bagels at home but I do make pretzel bites which are small mouthfuls of soft pretzel deliciousness. Perhaps it’s because I am indecisive or that I cannot commit to just one bagel topping but everything bagels have always been my flavor of choice.

If you aren’t familiar with everything bagels, they are topped with a combination of ­­­poppy seeds, sesame seeds, dried garlic, dried onion, and coarse salt. You can make your own everything seasoning mix or stop by Trader Joe’s and pick up their ‘Everything but the Bagel’ seasoning mix.

Until I discovered the Trader Joe’s seasoning I typically topped by pretzel bites with coarse salt. But, now when I make them I sprinkle them liberally with everything seasoning mix. If you don’t have a Trader Joe’s near you, then here is a quick video that shows how to make your own everything seasoning mix at home.

The pretzel-making process may sound daunting but it really isn’t that bad. Once you set up an assembly line the process isn’t really that bad. I use my stand mixer to make the dough and just knead with my hands a few times at the end before letting the dough rest in an oiled bowl. Then, section the dough and roll each section into a long rope and cut into bite-sized pieces. A quick dunk into a pot of boiling water with baking soda and those babies are ready for the oven.

Everything Pretzel Bites-3

Unless you live in New York City, it isn’t always easy to grab a good soft pretzel as you are wandering around town. That is why I started playing around with making them myself. Everything pretzel bites are a game time staple during football season.

There is something super satisfying about popping one of these pretzels hot from the oven into your mouth with only a quick detour into a pile of mustard or cheese sauce. But, be warned these everything pretzels are pretty addictive. Even if you think you have made enough you may find that they disappear as quickly as you can churn them out.

How to Make Everything Pretzel Bites

Other finger foods you may be interested in are:

Everything Pretzel Bites

Eggplant Parmesan

Eggplant Parmesan-8

Are you an eggplant lover or an eggplant hater? People seem to fall firmly into one camp or the other. Growing up in an Italian family, eggplant was a staple on our dinner table. That purple beauty was most commonly served in the form of eggplant parmesan.

Fun fact, when my son was a little boy he called eggplant ‘the punching bag fruit’. I still think that this is the cutest thing ever. The punching bag fruit. When buying eggplants at the market you want to look for ones that have smooth purple, shiny flesh and that feels heavy for its size.

Breaded eggplant slices

If you are feeling unsure of how to buy and prepare eggplant you can check out this video. For eggplant parmesan, I don’t typically salt the slices of eggplant but I do if the eggplant will be used in a dish that isn’t covered in sauce and cheese.

There are as many variations of eggplant parmesan as there are Gambino families. Some family recipes call for slicing the eggplant thick, some thin, some peel the eggplant, and others don’t. Then there is the fry their eggplants slices devotees versus the eggplant slice bakers. Personally, I like my eggplant peeled, thinly sliced, coated in panko, parmesan, and baked.

Finished pan of eggplant parmesan

The process of making eggplant parmesan isn’t that much different than making lasagna. Instead of layering noodles, you layer slices of eggplant with marinara and seasoned ricotta cheese. This recipes calls for two eggplants and will fill a 9 x 13 pan but you can also just use one eggplant and bake it in a 9 x 9 or small round casserole.

Side view of eggplant parmesan

This may sound weird to anyone who didn’t grow up in an Italian family but leftover eggplant parmesan makes a divine filling for a sandwich. But, the bread must be a crusty loaf of Italian bread or a baguette if you don’t have good Italian bread in your part of the world.

How to Make Eggplant Parmesan

Other Italian recipes you might enjoy:

Eggplant Parmesan

Crispy Artichoke Hearts with Lemon Aioli

Crispy Artichoke Hearts with Lemon Aioli

Artichokes have always been part of my family’s holiday traditions. As long as I can remember, my Grandparents would fly into town for Thanksgiving and my Grandmother would always make stuffed artichokes. Whole artichokes were ‘stuffed’ with breadcrumbs, parmesan cheese, and seasoning then steamed for 45 minutes. So, these crispy artichoke hearts with lemon aioli are a nod to her and my family’s Italian ancestry. Equally as delicious but much quicker to prepare and cost effective because you use frozen artichoke hearts instead of fresh whole artichokes.

Don’t get me wrong, I love whole artichokes and still cook them from time to time but I have fallen for this preparation of crispy artichoke hearts with lemon aioli as one of my go to appetizers. Another thing that I love about this recipe is that you can keep all the ingredients on hand fairly easily so no running to the store at the last minute because your friends are doing a pop in this evening for a drink. Doesn’t that sound good?

Crispy Artichoke Hearts with Lemon Aioli 3
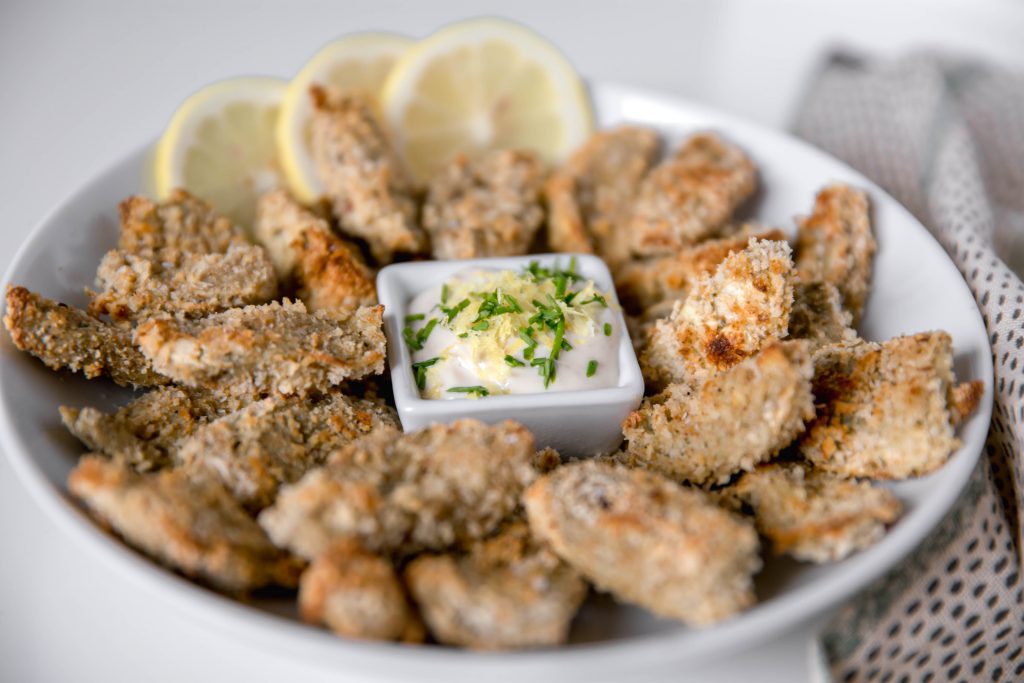
But first, I want to talk for a minute about growing artichokes in your garden. Have you grown them? Have you seen them growing in someone else’s garden? One of my friends had a neighbor who had them in her garden and they were rather magnificent. Check out the video below to see what they look like in the wild. Well, not the wild but not in the grocery store or Costco.

Okay, back to crispy artichoke hearts with lemon aioli. I keep a bag or two of artichoke hearts in my freezer all the time. With a simple egg wash, a dunk into bread crumbs, a quick bake in the oven, you can have an elegant appetizer ready in less than thirty minutes. Be sure to check out my recipe for Asparagus and Artichoke Frittata if you want more artichoke recipes.

You will also want a dipping sauce for these crispy bites. There are two sauces that I love to serve with crispy artichoke hearts. One is a lemon aioli which is luscious and a great companion for the artichokes. You can also serve them with marinara sauce which is a little bit lighter than aioli.

How to Make Crispy Artichoke Hearts with Lemon  Aioli

Whether you decide to dip in aioli or marinara sauce or both, let me know if you try these crispy artichoke hearts. You can be sure that I will be serving these up this holiday season.

Crispy Artichoke Hearts with Lemon Aioli

Spicy Cucumber Salad with Peanuts

Spicy Cucumber Salad with Peanuts

I have been making Spicy Cucumber Salad with Peanuts for years, well over a decade, in fact. This is one my go-to recipes that is in heavy rotation especially during the summer months when I crave cool, crisp, and refreshing meals. I prefer to use English (or hot house) cucumbers for this recipe because of their thin skin and few seeds but if you grow your own cukes, by all means, use them.

The funny thing about cucumbers is that I didn’t like cucumbers (at all) until I was an adult. I adored pickles as a kid but wouldn’t touch cucumbers with a ten-foot pole. That’s weird, right?

Spicy Cucumber Salad with Peanuts is super easy to make. You combine a few ingredients like rice wine vinegar, water, sugar, crushed red pepper flakes in a small sauce pan and simmer until the sauce is reduced by half. The dressing is terrific blend of sweet, spicy, and acid.

While the dressing cools, slice the cucumbers very thin.  Using a mandoline makes this job a snap and results in perfectly uniform slices. The video below shows how to use a mandoline and features the exact same OXO brand mandoline that I use. I love it because I can set the width of the slices and it makes slicing so easy, just be very careful because the blade is sharp. Always use the included safety guard when using the mandoline.

After slicing the cucumbers, I recommend putting the slices into a colander and sprinkling them liberally with salt. The salt will draw the moisture out of the cucumber which results in crisp slices in your salad. Be sure to rinse the salt off the slices and then use a paper towel or clean kitchen towel and pat the slices to remove excess moisture before adding the dressing.

Just before serving Spicy Cucumber Salad with Peanuts, sprinkle the salad or individual servings with chopped up dry-roasted peanuts. The peanuts add that salty crunch which is the perfect foil for the cool, crisp cucumbers.

Sometimes I will make a pot of rice and serve the Spicy Cucumber Salad with Peanuts in a bowl with a scoop of rice. I love to make Spicy Cucumber Salad with Peanuts to accompany Hawaiian Poke. Check out my recipes for Spicy Ahi Tuna Poke or Ginger Salmon Poke with Mango and Avocado. Grilled meat or fish would also make a great accompaniment to this salad.

How to Make Spicy Cucumber Salad with Peanuts

Spicy Cucumber Salad with Peanuts

Spicy Cucumber Salad with Peanuts

Beet Sliders with Green Goddess Dressing

Beet Sliders with Green Goddess Dressing

Aren’t sliders adorable? I think most things in miniature form are cuter than their full size counterparts. Think babies, puppies, kitties, and burgers. However, why should meat-eaters have all the slider fun? They shouldn’t, right?

Now that we are in agreement on that, let’s talk about these Beet Sliders with Green Goddess Dressing. Boiling the beets along with a variety of aromatics imparts great flavor into the beets. The Green Goddess Dressing is creamy, herby, and delicious, which complements the earthiness of the beets. Red onions offer crunch and bite to the slider. The combination is top notch.

Beet Sliders with Green Goddess Dressing

I estimate that approximately 99% of slider recipes that I come across feature some sort of meat filling. You know that I am always up for a challenge. Therefore, I want to create delicious options for vegetarian sliders. These Beet Sliders are not only gorgeous; they are perfect to eat while drinking a glass of wine or a beer and listening to Budos Band.

I would plan to serve two to three sliders per person for a perfect small plate offering. I adore small plates. Small plates always feel like a party. I would much rather have a few small plates than one entrée any day. Honestly, every day that would be my preference. Small plates are perfect for the chronically indecisive, possibly commitment challenged.

Beet Sliders with Green Goddess Dressing

I digress. Let’s move on the these sliders. The key to any burger is getting the bun and burger to match up in size. Be sure that your beets are as big in the widest part as the bun they will eventually sit on. Once the beets are cooked and peeled, you will want to slice them into about one-inch rounds.

While the beets cook, whip up the ingredients for the Green Goddess dressing and thinly slice part of a red onion. I always recommend wearing latex or rubber gloves when working with beets. Beets stain everything they encounter so exercise care when preparing them.

If you are beet lover, you may want to check out these other recipes:

Beet Sliders with Green Goddess Dressing


Parmesan Broth with White Beans and Kale

Parmesan Broth with White Beans and Kale

You don’t throw away those end rinds of Parmesan cheese, do you? Please don’t. Ever. Take them and place them in a freezer baggie and freeze them for future use. Or, next time you are at a grocery store that has a nice cheese section, look around, sometimes stores will sell the rinds. Buy them. Every single one that you can find and stash them in the freezer like you are a squirrel hoarding acorns for the winter. These little flavor bombs are perfect to add to soups, stews, a pot of beans, and, of course, making Parmesan broth.

Parmesan Broth

Making a pot of Parmesan broth is ridiculously simple. Plus, the smell of Parmesan broth cooking on your stove top will infuse your kitchen with the most delectable smell. The broth can be ready in under an hour. Then, you can decide whether add a few more ingredients and have dinner on the table or if you want to use the broth later, place it in the fridge or freezer for future use.

To make the broth you will put water, an onion, cloves of garlic, and the Parmesan rinds into a pot or Dutch oven. You don’t even have to peel the onions and garlic! Simmer for 45 minutes. Then, strain the soggy solids out which will have given up every ounce of flavor, and there you will have Parmesan broth. Now comes the fun part. What ingredients will you add to transform this broth into a scrumptious bowl of soup?

Parmesan Broth with White Beans and Kale

The world is your oyster here! Feel free to add whatever soup ingredients that you like. I decided to add a can of white beans, some leftover cooked quinoa, and kale. The addition of these ingredients transforms the Parmesan broth into an incredibly satisfying and hearty meal.

This recipe was inspired by the incredible Julia Turshen cookbook ‘Small Victories’. I would encourage you to track down a copy. Julia is a cookbook author, food writer, and hosted the first two seasons of Radio Cherry Bombe which featured interviews with amazing women in the world of food.

Small Victories book cover Turshen

In the recipe from Small Victories, Julia added peas and some small pasta to her Parmesan broth. One of the features of the cookbook that I really enjoy in that she offers variations for all her recipes. I find that those suggestions inspire my creativity and also encourage me to look around my fridge, freezer, and pantry to use ingredients that I already have on hand rather than running to the store. One of her variations recommended beans and greens which I almost always have on hand. Plus, I had some leftover quinoa in the fridge so I threw that into the pot too. The result was an perfectly warming meal on a frigidly cold night.

Parmesan Broth with White Beans and Kale

Parmesan Broth with White Beans and Kale Pin

Roasted Cauliflower with Tahini Sauce and Pomegranate Seeds

Roasted Cauliflower with Tahini Sauce and Pomegranate Seeds
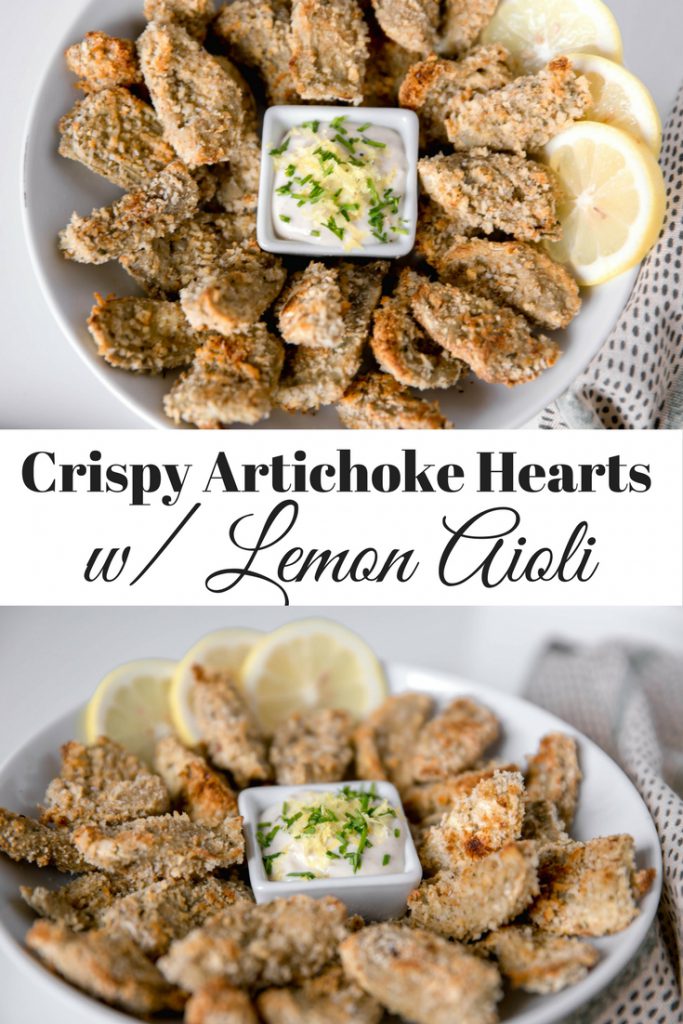
Steamed cauliflower stinks. Growing up I couldn’t stand the smell that would permeate beyond the kitchen when my Mom would steam cauliflower. So, for years I didn’t think that I liked cauliflower because it would never make it past my lips based on the smell alone.

Then, one day I discovered roasted cauliflower and my entire world view of cauliflower completely changed. Suddenly, I couldn’t get enough of the stuff. I often have cauliflower in my grocery cart during the winter months especially when the availability of fresh locally-grown produce is sparse.

Roasted Cauliflower with Tahini Sauce and Pomegranate Seeds
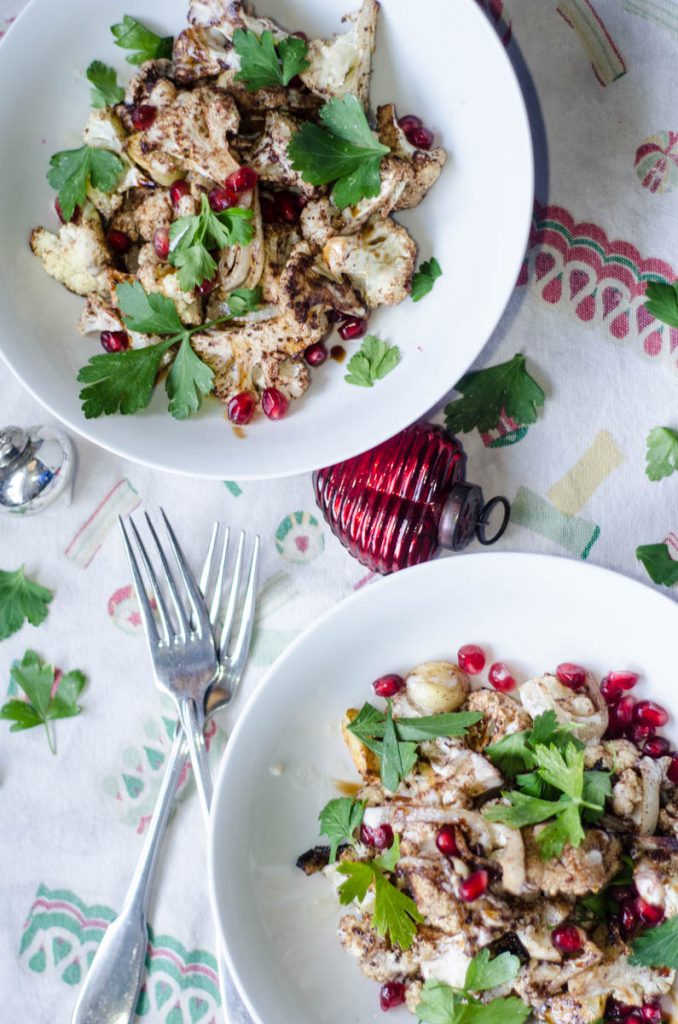
Have you tried roasting cauliflower? I want to urge you to give it go if you’ve only had it steamed and didn’t care for it. You might find that roasting cauliflower changes your mind. I love cauliflower roasted simply with olive oil, salt, and pepper. But, sometimes you want a dish that has a little more pizzazz.

Roasted Cauliflower with Tahini Sauce and Pomegranate Seeds
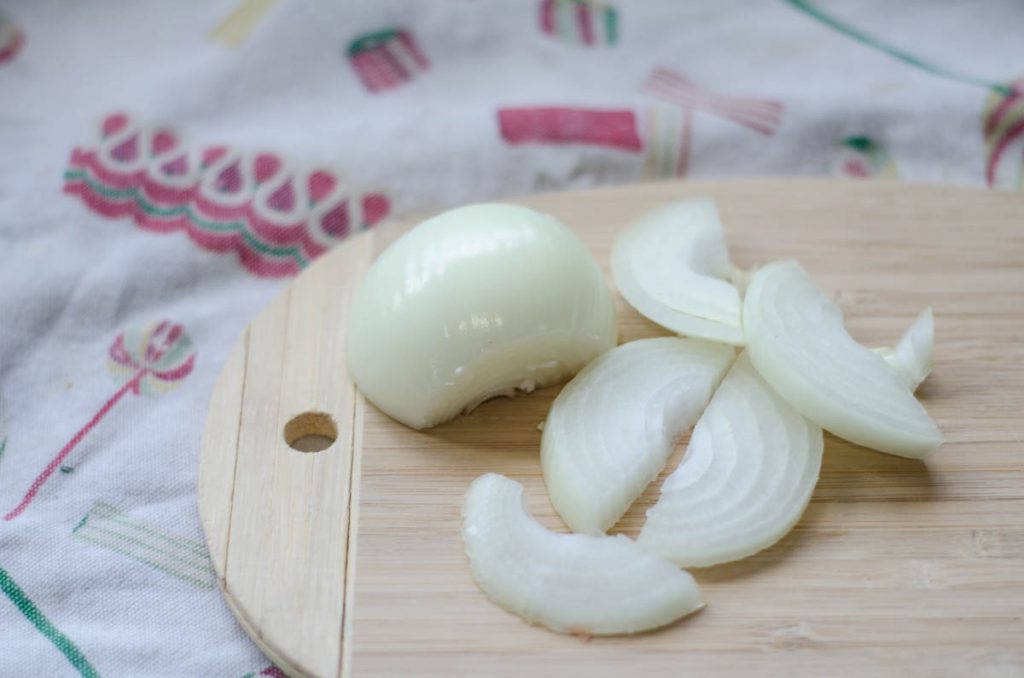
I think this roasted cauliflower with tahini sauce and pomegranate seeds could be a star of your holiday table. Or, it would brighten up a dreary winter meal. The pomegranate seeds make the dish sparkle!

The cauliflower is seasoned with an array of warming spices including sumac. Sumac is commonly used in Mediterranean and Middle Eastern cooking. If you aren’t familiar with sumac, it is well worth adding this lemony-flavored spice to your pantry.  Sumac can be found as Middle Eastern markets or ordered online.  Buying new spices is one of the reasons I love shopping at ethnic markets.

Roasted Cauliflower with Tahini Sauce and Pomegranate Seeds
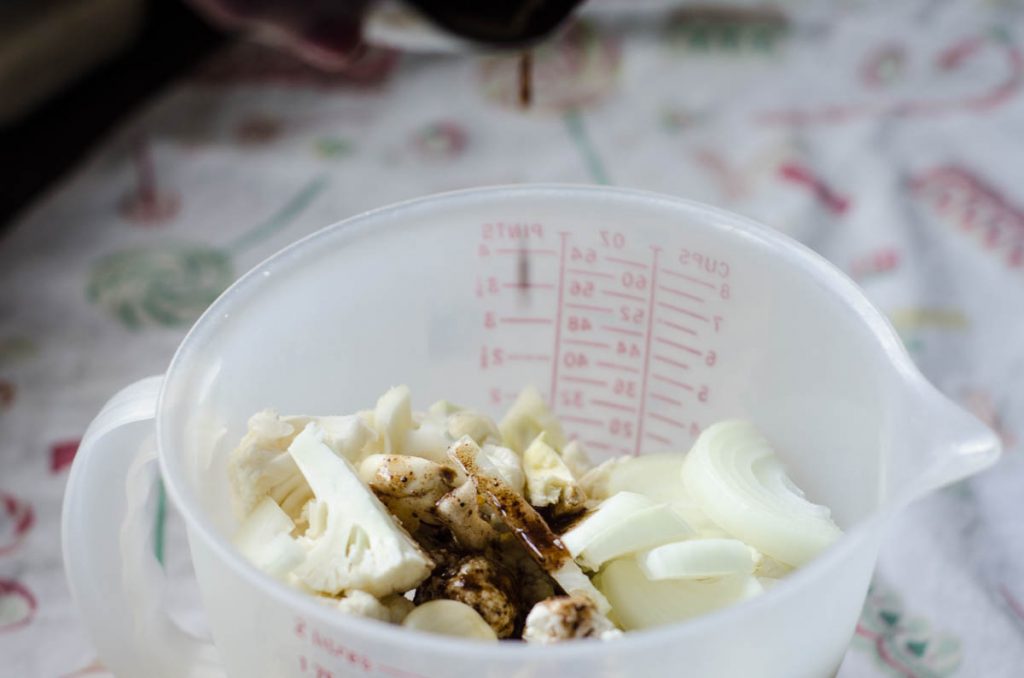
Tahini is crushed sesame seed paste and a crucial ingredient in hummus, baba ghanoush (roasted eggplant dip), and halva (a sweet confection which was a childhood favorite of mine). Tahini is available in most supermarkets in the ethnic food aisle. You will want to give the paste a stir before using because much like natural peanut butter, tahini can separate when sitting on the shelf.

Roasted Cauliflower with Tahini Sauce and Pomegranate

Roasted cauliflower with tahini sauce and pomegranate seeds

Garlic Ginger Baby Bok Choy

Garlic Ginger Baby Bok Choy | Veggie | Asian | VegetarianBroccoli and cauliflower sometimes bore me. I need novelty. I like to mix things up a little in order to keep it interesting. Once the garden is done and farmers markets have packed it in for another year I crave variety in my produce. One way that I satisfy that craving is to grocery shop at ethnic markets.

Garlic Ginger Baby Bok Choy | Asian | Vegetarian | Easy | Healthy

On a recent trip to an Asian market I picked up a large bag of baby bok choy for about $2.50. Baby bok choy is tender, mild, and can be substituted for any other green that you typically use like spinach or Swiss chard.

Garlic Ginger Baby Bok Choy | Asian | Vegetarian | Easy | Healthy
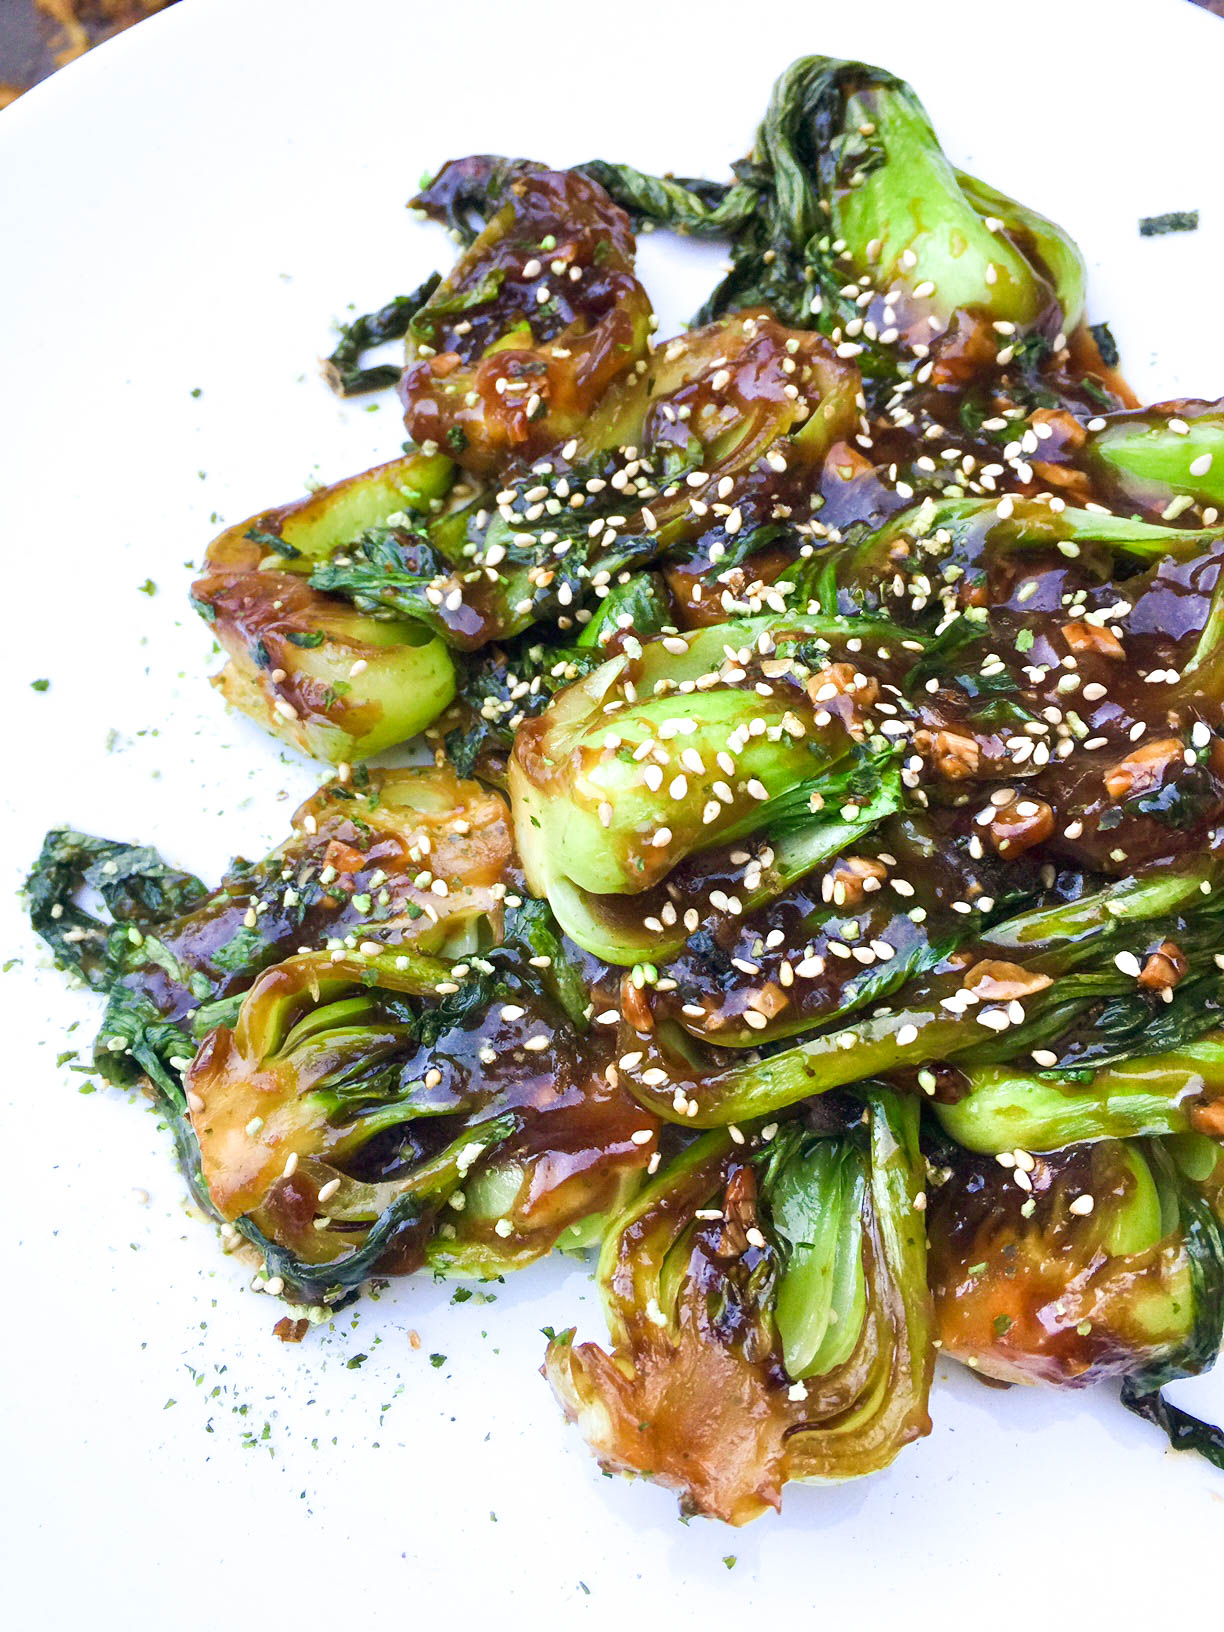
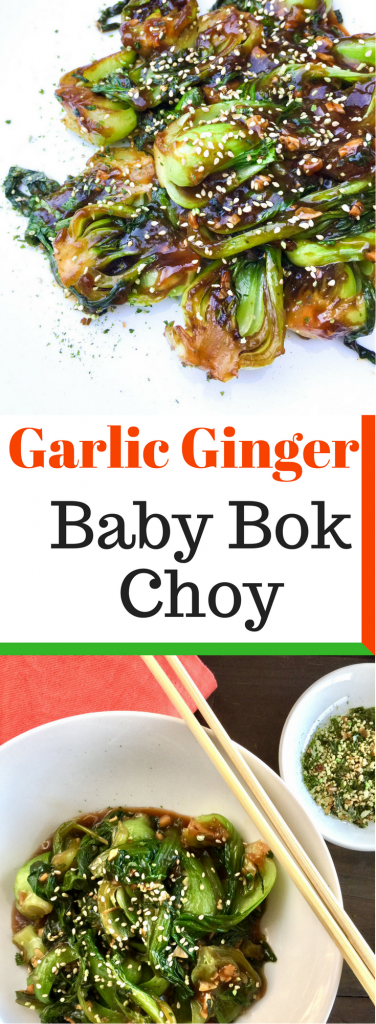
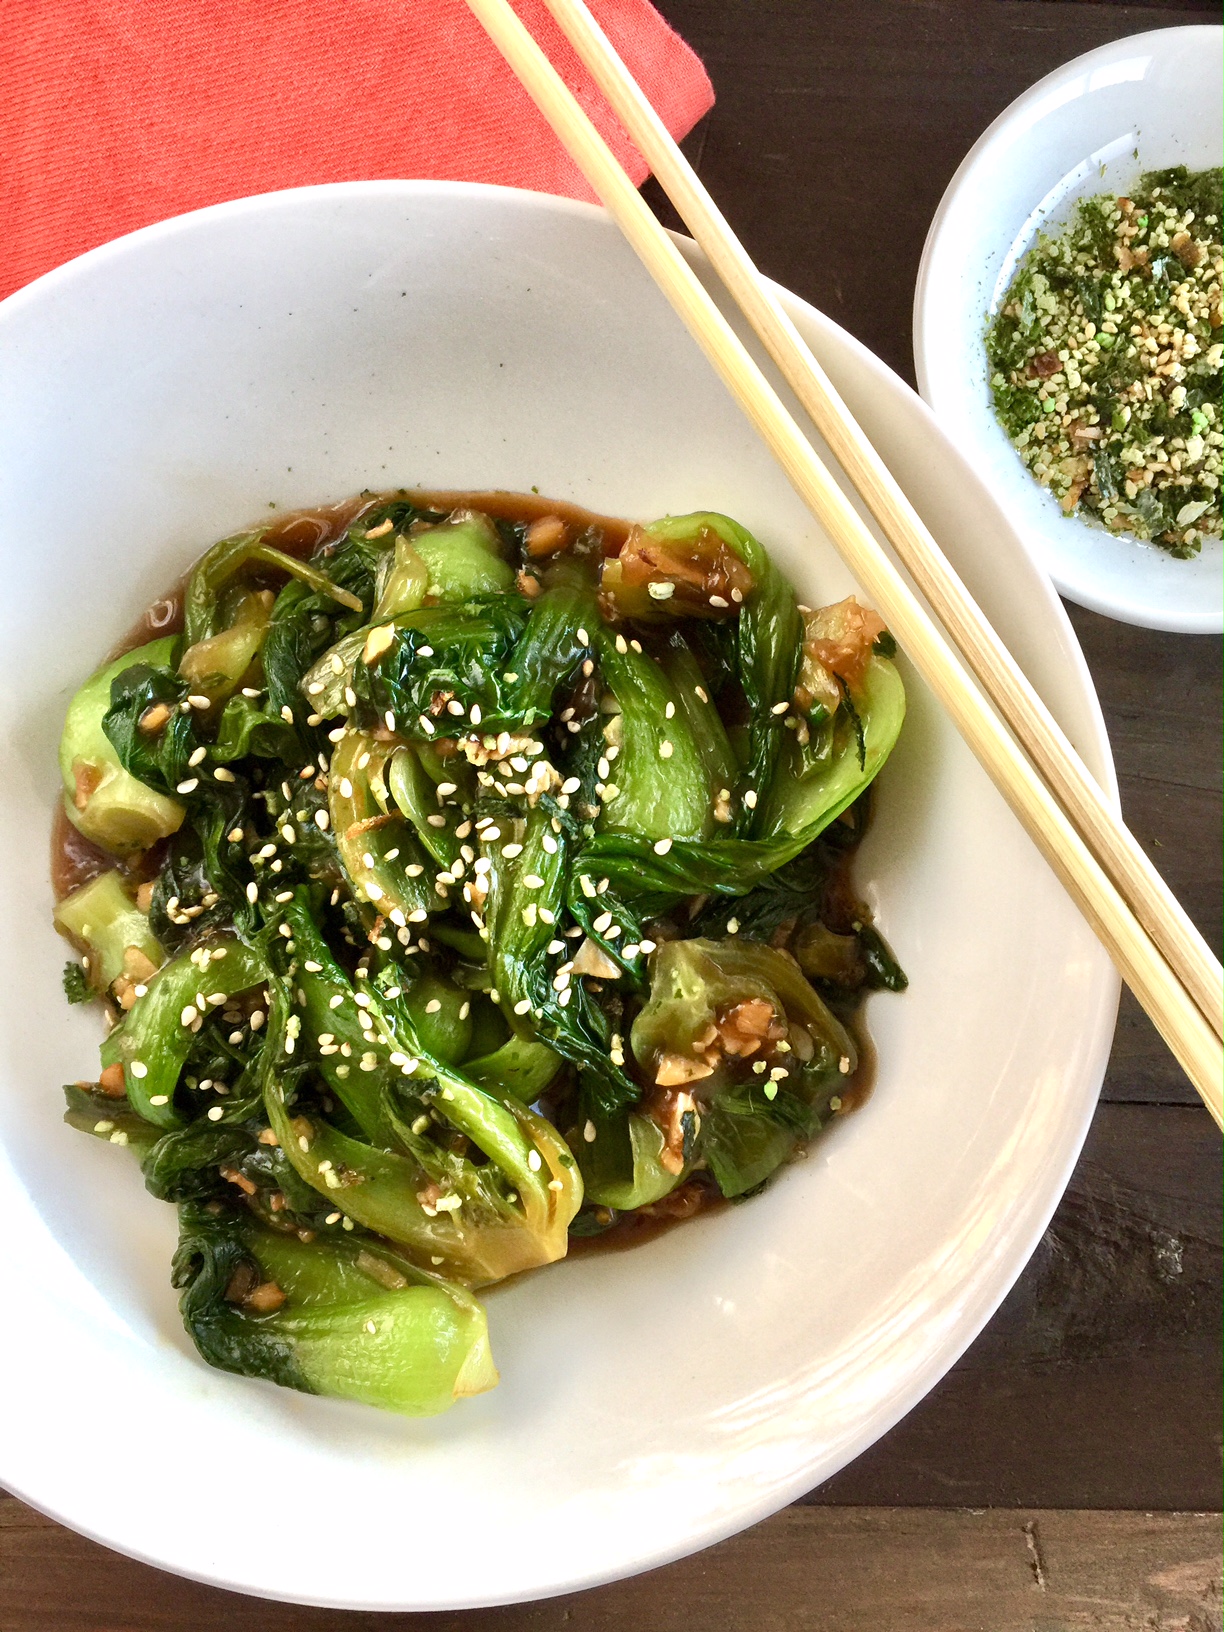
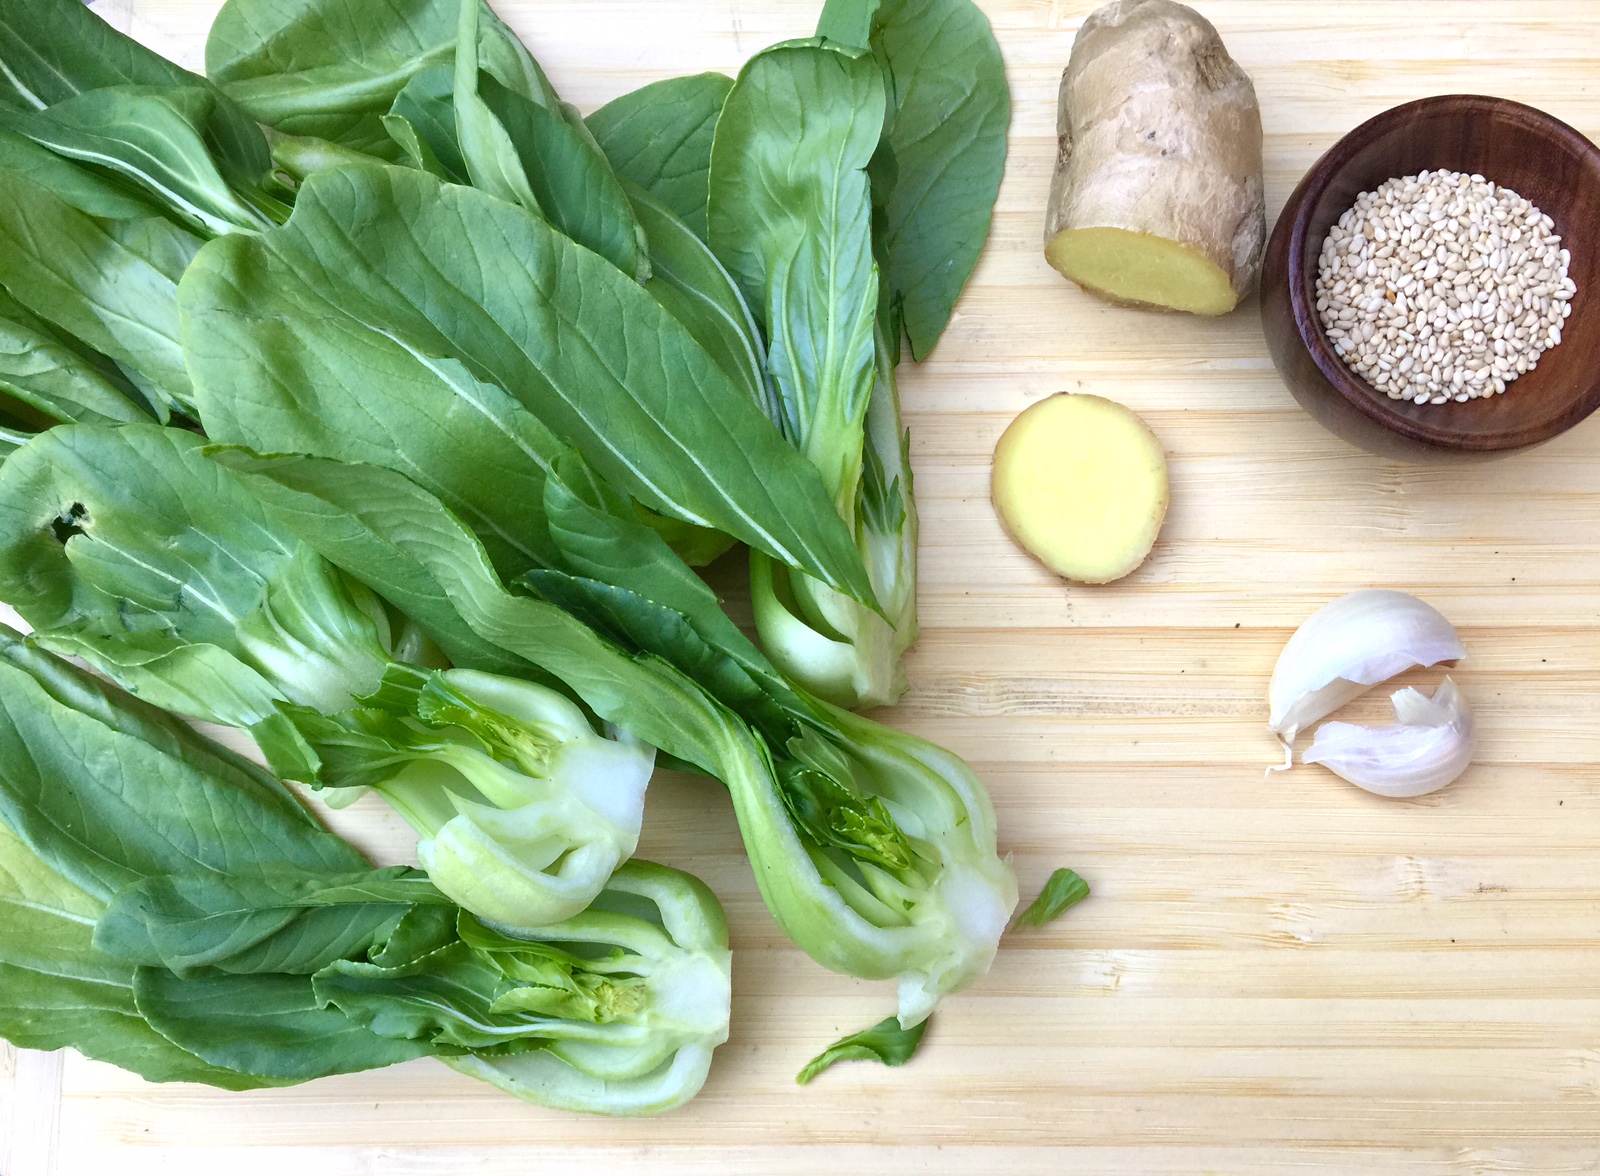
I used the baby bok choy in noodle soup, sautéed with onions, peppers, and mushrooms in a frittata, and stir-fried in a delectable sauce of garlic, ginger, soy sauce, and sesame oil. Baby bok choy is easy to prepare by rinsing it under water in a colander and let it drain. It can be chopped into thin ribbons or in this recipe the bok choy is sliced in half lengthwise.

Another item I like to pick up from the Asian is the spice blend Furikake which is a mix of sesame seeds, chopped seaweed, sugar, and salt. It adds a  wonderful flavor to rice, vegetables, and yes, popcorn! I am a little bit obsessed with this stuff.

Garlic Ginger Baby Bok Choy

Powered by WordPress & Theme by Anders Norén