The Passionate Pursuit of Delight

Ingredient: carrots

Green Papaya Salad

Green Papaya Salad

Thai food lovers rejoice! If you love Green Papaya Salad (sometimes called Som Tum on Thai menus) you will be excited to learn that it is very easy make at home. Green Papaya salad is light, healthy, and so fresh tasting. It is one of my favorite Thai dishes whether I am dining at a Thai restaurant or cooking Thai food at home.

If you live near an Asian market, you can make this Thai restaurant favorite quickly and easily. If you haven’t ever ventured into an Asian market or any ethnic market for that matter, here is an article I wrote about why you should.

Green Papaya Salad overhead shot

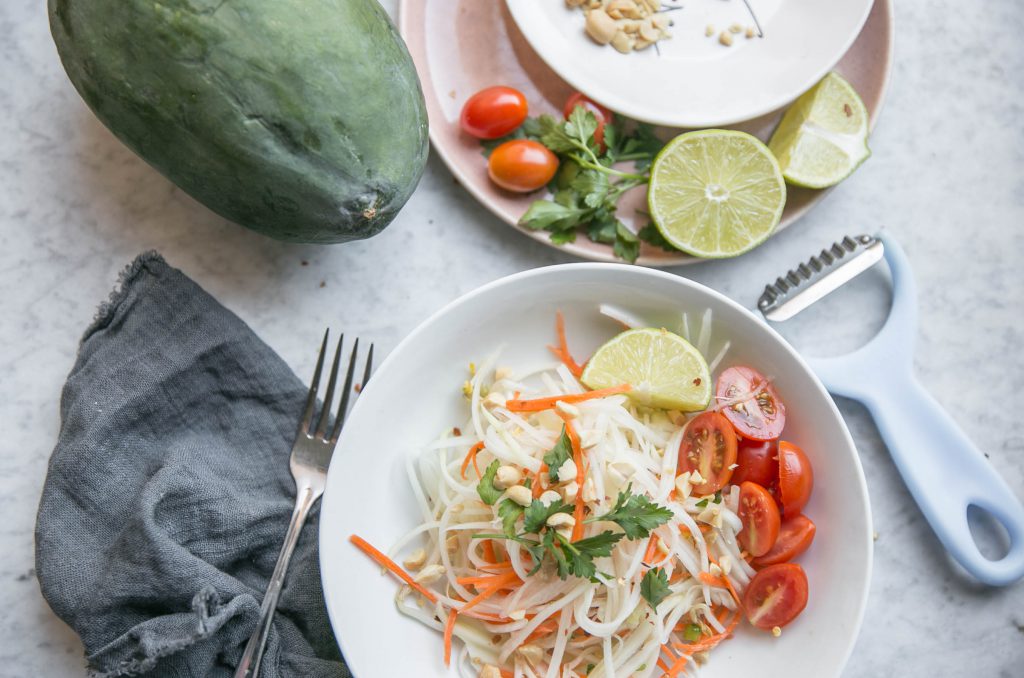
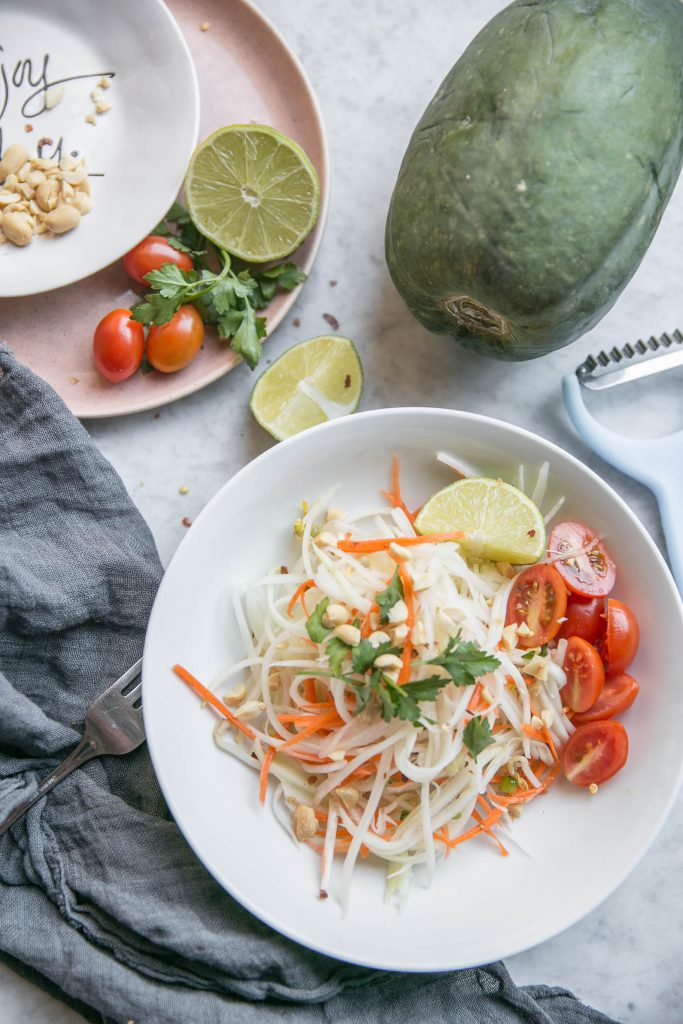
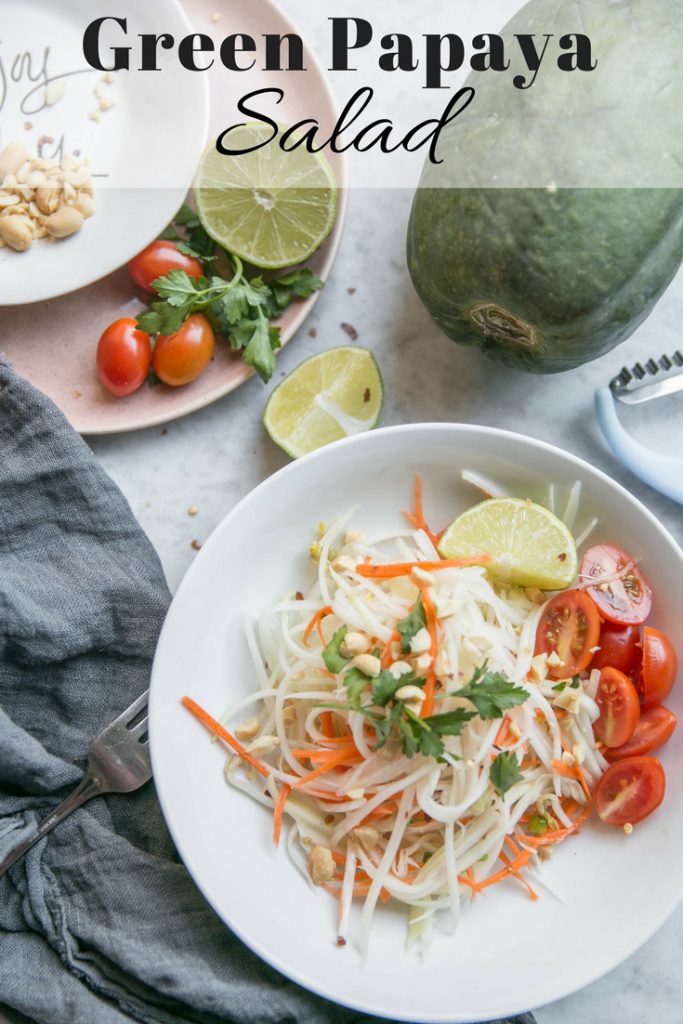
First, go to the produce section. Asian markets have incredible produce, much of it may be new to you. Typically, there are an amazing array of greens, mushrooms, and potatoes. But, today you will want to look for a green papaya which looks like a dark green football. Green papayas are unripe papaya, so, instead of sweet orange flesh the unripe flesh is crisp. If you cannot find green papayas locally, you can substitute cucumbers which are similar in texture albeit more watery.

Another important part of this recipe is the serrated peeler. Using this peeler will result in thin strips of vegetable similar to julienne slices. Serrated peelers can be found on Amazon and at Asian markets. You will use the serrated peeler on the green papaya and carrots. If you have a mandonline slicer you can also use the julienne blade to slice the veggies.

Once the veggies are sliced, you just need to combine the dressing ingredients in a small bowl or Mason jar. Thai food always focuses on the balance of flavors between sweet, sour, salty, and spicy. This dressing combines all those flavors for a nicely balanced dressing.

Pour the dressing over the veggies and toss to combine. Garnish with chopped peanuts and fresh herbs before serving.

Green Papaya Salad aka Som Tum

Carrot Scallion Coriander Salad

3/4 shot of carrot scallion coriander salad

Have you seen the beautiful colorful carrots in the market lately? I have been seeing bags of full-sized colorful carrots for a while now in grocery stores. But, just recently I have seen bags of colorful baby carrots too. So, recently I picked up a few bags of those colorful babies and wanted to figure out a way to showcase their bright colors in a crisp carrot salad.

In case you were wondering, the colorful carrots while a bit bling-y taste just like orange carrots but the range of colors are best showcased in raw carrots. Cooking or roasting the carrots will mute their vibrancy a little. Fortunately, no cooking is necessary for this recipe. All you need to do is a little slicing and chopping.

Overhead shot of two plates of carrot scallion coriander salad

You know that I am a mandoline slicer evangelist. I use this kitchen tool ALL THE TIME! For example, here are a few recipes which are a breeze to make when you use a mandolin: Golden Beet and Cucumber Salad, Maple Walnut Crostini and Spicy Cucumber Salad with Peanuts.

How to Make Carrot Scallion Coriander Salad

But, back to this deliciously crisp and colorful carrot scallion salad. You can make the dressing ahead of time if you like. I toasted raw walnut pieces for a few a few minutes in a small pan on the stove top. Toasting the nuts brings out the flavor so don’t skip this step. I used my mandoline to slice the radishes and carrots. Instead of slicing the carrots into rounds, I held the carrots on the side and sliced them into ribbons. Don’t you think they look pretty?

Once your veggies are sliced, place them on a platter. You can also make four individual plates of salad if you prefer. Next drizzle the dressing evenly over the veggies and then top with walnuts. If you are a walnut fan you could substitute a different nut. I think pistachios would be very nice too.

Carrot Scallion Coriander Salad

Beer Cheese Soup

Beer Cheese Soup-1

You probably know that Wisconsin has the lock on any beer cheese soup recipe. Heck, Wisconsin most likely has the lock on anything to do with beer or cheese in general. But, here I am, offering up my own version of beer cheese soup with a little bit of western flair. Please forgive me Midwesterners, we just want in on some of the beer cheese soup fun.

Beer cheese soup is a fall essential. It is perfect to have on cool autumn weekends whether you have just finished raking leaves, picking apples, or watching football. I make a pot of soup every weekend and enjoy having leftovers for the work week ahead. For me, a bowl of soup is ideal for a quick weeknight dinner or equally awesome to take to work for lunch.

Beer Cheese Soup-5

Sometime during my 30s, my body decided that it no longer could handle milk or cream in any form. So, instead of using half and half to add a creamy element to the soup, I made cashew cream using this recipe. If you are not bothered by cream you can use it instead but I really do love cashew cream.

You can choose your favorite cheddar for beer cheese soup. I typically go with sharp cheddar because I love the flavor but if you or your people prefer a more mild cheddar by all means go with that. I do feel as though having some sort of bread to dip into the soup is essential.

Beer Cheese Soup-7

I was wowed by the photogenic quality of this beautiful baguette but also think soft pretzels would be fantastic to serve with beer cheese soup. I have used this recipe to make soft pretzel bites before and they were delicious and perfect for dipping. But, I am eyeballing this recipe for everything soft pretzel bites. Don’t you think they would be fantastic with beer cheese soup? I love everything that is everything flavored. By the way, have you tried the ‘everything but the bagel’ seasoning at Trader Joe’s? Recommended.

How to Make Beer Cheese Soup

Beer Cheese Soup pin

Roasted Carrot and Goat Cheese Sandwich

Roasted Carrots with Goat Cheese

Life is too short for the same old, same old sandwiches. How many peanut butter & jelly, tuna, or egg salad sandwiches can one person eat in a life time? Sandwiches are simple, portable, and can be quite delicious with just a little bit of effort and creativity. I love sandwiches that have a mix of colors, textures, and tastes.

In this roasted carrot and goat cheese sandwich you get sweetness from the roasted carrots, tangy creaminess from goat cheese, and a bit of salty bite from the green olives. Are you familiar with the spice blend za’atar? It is a Middle Eastern seasoning made from dried herbs, spices, and sesame seeds. I buy za’atar at the Middle Eastern market. You can also order za’atar on Amazon.

You may recall this recipe for Za’atar Roasted Tomatoes and Pita Chips from earlier this year.

Roasted Carrots with Goat Cheese

If you aren’t a fan of goat cheese you can use cream cheese instead. The cream cheese will have less tang and a smoother texture. Plus, it might be easier to find and more economical but I love goat cheese so usually use it for this sandwich. Also, if you aren’t a green olive lover you can leave them out, use black olives or substitute capers instead.

You will want to use a bread that when toasted is hearty enough to hold up to spreading the thick goat cheese mixture. I used plain white sandwich bread but I can think of a few other breads that would make a great sandwich. I like the idea of a walnut raisin bread or a honey wheat bread.

Next time I make this sandwich, I will use thicker carrots and slice them slightly on the diagonal in order to get more surface area to roast. I also think that thicker slices of roasted carrot will make the sandwiches more substantial when you go in for a bite.

Roasted Carrots with Goat Cheese

What are your slightly out-of-the-box sandwiches you like to make and eat? I am always looking for something new.

How to Make Roasted Carrot and Goat Cheese Sandwiches

roasted carrot and goat cheese

Beet Sliders with Green Goddess Dressing

Beet Sliders with Green Goddess Dressing

Aren’t sliders adorable? I think most things in miniature form are cuter than their full size counterparts. Think babies, puppies, kitties, and burgers. However, why should meat-eaters have all the slider fun? They shouldn’t, right?

Now that we are in agreement on that, let’s talk about these Beet Sliders with Green Goddess Dressing. Boiling the beets along with a variety of aromatics imparts great flavor into the beets. The Green Goddess Dressing is creamy, herby, and delicious, which complements the earthiness of the beets. Red onions offer crunch and bite to the slider. The combination is top notch.

Beet Sliders with Green Goddess Dressing

I estimate that approximately 99% of slider recipes that I come across feature some sort of meat filling. You know that I am always up for a challenge. Therefore, I want to create delicious options for vegetarian sliders. These Beet Sliders are not only gorgeous; they are perfect to eat while drinking a glass of wine or a beer and listening to Budos Band.

I would plan to serve two to three sliders per person for a perfect small plate offering. I adore small plates. Small plates always feel like a party. I would much rather have a few small plates than one entrée any day. Honestly, every day that would be my preference. Small plates are perfect for the chronically indecisive, possibly commitment challenged.

Beet Sliders with Green Goddess Dressing

I digress. Let’s move on the these sliders. The key to any burger is getting the bun and burger to match up in size. Be sure that your beets are as big in the widest part as the bun they will eventually sit on. Once the beets are cooked and peeled, you will want to slice them into about one-inch rounds.

While the beets cook, whip up the ingredients for the Green Goddess dressing and thinly slice part of a red onion. I always recommend wearing latex or rubber gloves when working with beets. Beets stain everything they encounter so exercise care when preparing them.

If you are beet lover, you may want to check out these other recipes:

Beet Sliders with Green Goddess Dressing


Roasted Carrot Hummus

Roasted Carrot Hummus

I saw Giada De Laurentiis make this recipe for Roasted Carrot Hummus recently on her Food Network television show Giada Entertains. I grabbed my computer during the episode and searched for the recipe on the Food Network website.

I was able to locate the recipe for Roasted Carrot Hummus but the photograph of the food on the website seemed a disservice to the appetizer that Giada demonstrated on her show. Isn’t the photo above of the Roasted Carrot Hummus much more appealing than the one posted below from the Food Network website?

Roasted Carrot Hummus

The photo of Roasted Carrot Hummus from the Food Network website

The experience that I had watching Giada’s show and many other similar experiences on the Food Network website inspired the new series that I am starting today. The focus of this series is take awesome recipes from the Food Network and to cook them at home. Then, the important part, we are going to take good photos of the recipes. The Food Network’s website has consistently terrible photos of their recipes. Did I mention that?

Roasted Carrot Hummus

I often feel frustrated when I want to pin a recipe from Food Network to my Pinterest account. The photographs of the food that come up are rather uninspired. I work hard to curate Pinterest boards that are full of tantalizing recipes and sometimes I won’t pin a recipe despite how good it sounds because the photo is bad.

So, I am taking on the challenge of a photography project to create beautiful photos of recipes that I see on the Food Network. This way I can pin the recipe and hopefully give the recipe the Pinterest love that it deserves.

Next up in this photography challenge

Here are few examples of delicious-sounding recipes that are paired with sad photos on the Food Network website. I plan to make and photograph these over the next few months.

Parmesan Pomodoro

Original photo from Food Network website

Rigatoni with Greens

Original photo from Food Network website

Southwestern Potato Salad

Original photo from Food Network website

See what I mean? Life is too short to post recipes with mediocre pictures.

Don’t you think the pin below would get a lot more repins on Pinterest than the one next to it?  This is important if you are an avid Pinterest user.

If you come across a poorly photographed recipe on the Food Network, shoot me an email with a link to the recipe and I will add it to the list of recipes that need to be photographed again. Also, I need a good hashtag for this project. If you can think of something clever, leave me a comment below.

Onto to the recipe, I made a few adjustments to the original recipe. I added tahini, cumin, and reduced the amount of oil.

Roasted Carrot Hummus

Easy Kimchi Fried Rice

Easy Kimchi Fried Rice
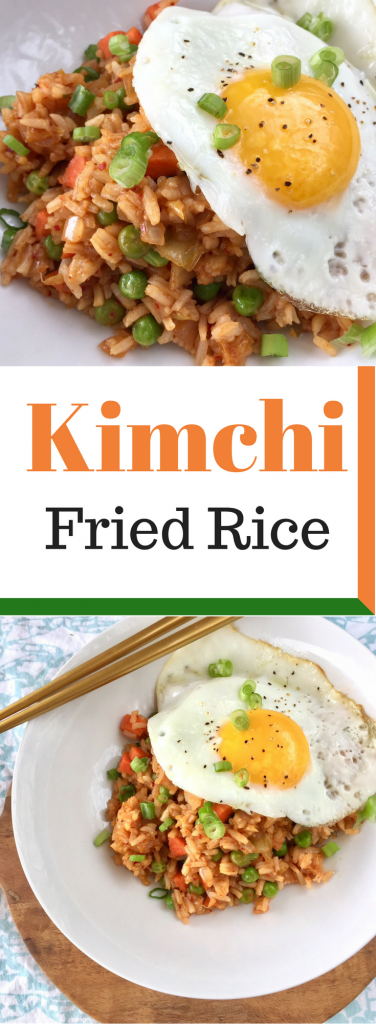
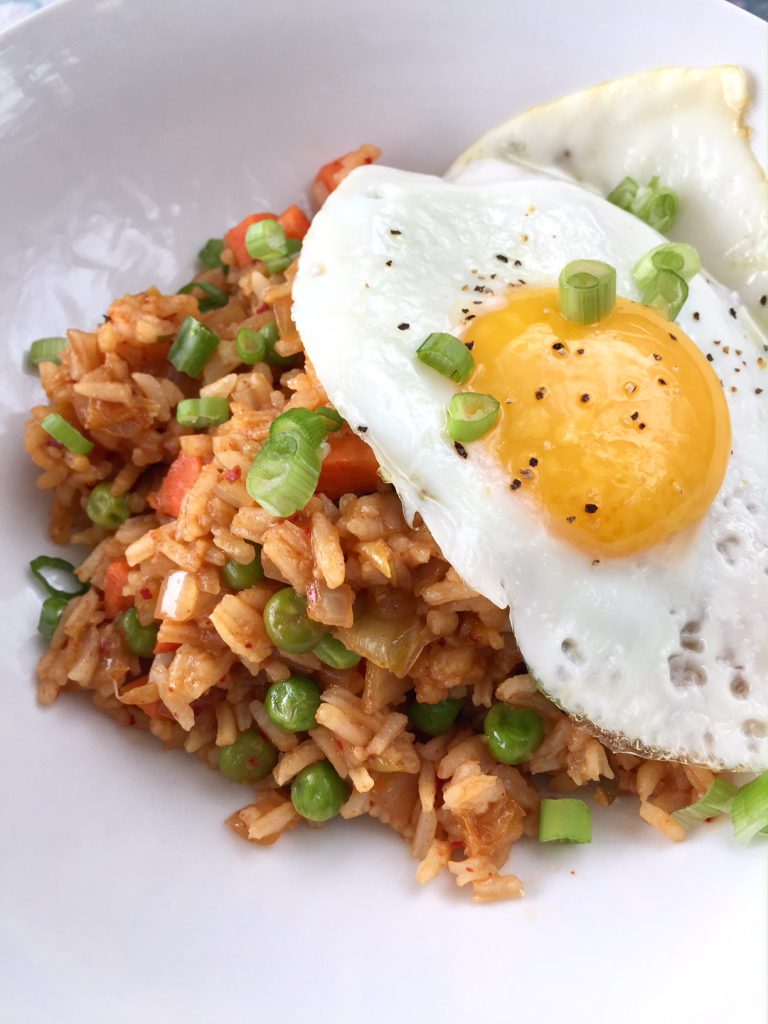
Don’t bother with take-out when you can make fried rice at home in no time at all. The secret is to cook your rice ahead of time. I usually cook it the day before I want to make fried rice but sometimes I will prepare a batch of rice and once it is cool I put it in a freezer bag and freeze it for future use. When you make fried rice you want the rice to be cold and a little dried out, so, it is preferable to not cook it just prior to making fried rice.

I adore kimchi. Kimchi is a Korean condiment of fermented cabbage. I love its funky flavor but know that it can be a bit of an acquired taste for many.  One benefit of kimchi is that it is full of probiotics from the fermentation process.  You can find kimchi in a glass jar in the refrigerated cases in the produce section of many grocery stores. Oftentimes, it will be placed near the tofu, egg roll and wanton wrappers. Adding kimchi to fried rice gives it great flavor but doesn’t overwhelm the dish.

Easy Kimchi Fried Rice
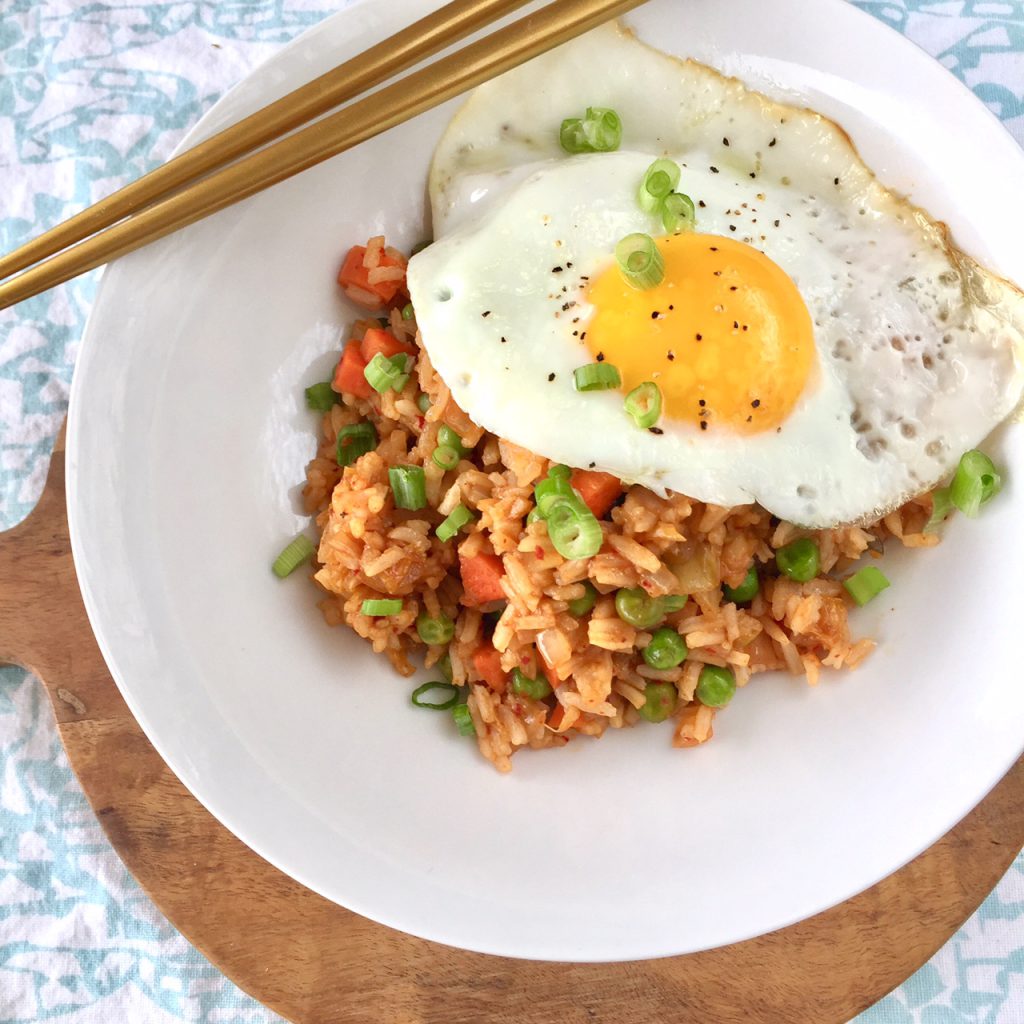
Another great thing about preparing fried rice at home is that you can customize it so it is exactly the way you like it. Add the veggies, protein, or flavors that you love. You can use this recipe as a base and then make it your own by preparing it just the way you want.

Sometimes I will scramble a few eggs and add them into the rice just as I am finishing it up. Other times, I will fry a few eggs sunny-side up and serve one on top of each serving of the fried rice. You can add shrimp, leftover pork or chicken, or pineapple or cashews!

See what I mean?  Once you try this recipe I hope you will be hooked.

Kimchi Fried Rice

Powered by WordPress & Theme by Anders Norén